Master Linux Bash History with historyctl, HISTFILE, and Shortcuts
DistroWatch ran a poll last month asking readers what the default shell is on their main distro. Bash took 412 votes. zsh got 30, fish 33. The winning answer, with 1,257 votes and 69% of the total, was “I do not know.” @Jymm shared that in our forum and I ended up in the replies sharing my use of zsh. The results have changed a bit since then, a bit tainted now that blogs and forums like this feature the standout surprises.
In my response to that forum topic, I explained that Kali defaults to zsh, and it has grown on me. If you change your mind, Kali-Tweaks lets you switch between zsh and Bash with a simple toggle.
When someone asked which features actually won me over, my answer was not themes or plugins. Smarter tab completion, and the history search where you start typing a command, hit up, and only the matching entries come back.
Then I added a caveat that I have been thinking about since: Bash can do some of this with tweaking, zsh just gives it to you out of the box.
A few replies later, another member said the history search was exactly the thing he had been looking for and he was not sure he had ever used it. That is the whole story with Bash history. Press up arrow, find a previous command, run it. That’s as far as most people get, and nothing in the defaults suggests there is more.
You can search it properly, control how much of it keeps, keep it in sync across terminals, and pull entries back out when you paste a secret into the wrong prompt. Most of it stays off until you switch it on.
This guide covers the history command itself, the expansion shortcuts, and the ~/.bashrc settings that matter on any machine you spend real time on.
How Bash History Works
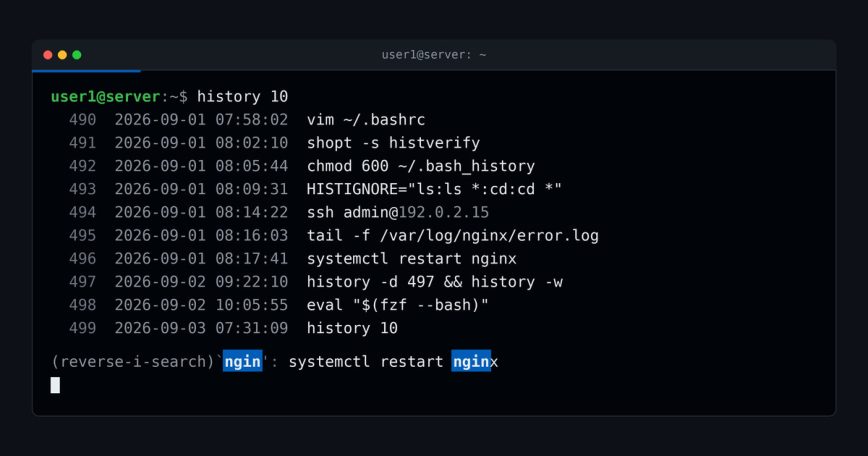
When history is enabled, Bash stores each command you type in an in-memory list. When you exit the shell, Bash writes that list to a file, typically ~/.bash_history. The next time you open a shell, that file gets loaded back into memory.
Not everything makes it in. HISTCONTROL, HISTIGNORE, and set +o history all keep commands out of that list, and all three are covered further down.
Two variables control the size of this:
HISTSIZE: how many commands to keep in memory during a sessionHISTFILESIZE: how many lines to keep in the history file on disk
The defaults are usually 500 or 1000 depending on your distro. That sounds like a lot until you are six months into a server and trying to remember that one openssl command you ran in January.
Check your current values:
echo $HISTSIZE
echo $HISTFILESIZE
echo $HISTFILE
Set either one to a negative number and Bash treats it as unlimited:
HISTSIZE=-1
HISTFILESIZE=-1
I would not do that on a shared box. Unlimited history means every hostname, every partial path, and every credential you have ever fat-fingered into a prompt lives forever in a plain text file that any process running as you can read. Pick a large number instead.
The history Command
Running history on its own prints your full command list with line numbers:
$ history
  495  df -h
  496  du -sh /var/log/*
  497  tail -f /var/log/nginx/error.log
  498  systemctl restart nginx
  499  history
To show only the last N commands:
history 20
To search history without scrolling through it, pipe it through grep:
history | grep nginx
history | grep "systemctl restart"
This is something I use constantly. Much faster than pressing the up arrow 40 times.
Running Commands from History
Bash has a built-in shorthand for re-running historical commands called history expansion. These all start with !.
Run the last command
!!
Runs the previous command verbatim. Useful when you forget sudo:
apt update
# Permission denied
sudo !!
Run by history number
!497
Runs the command at line 497 from your history list. Use history to find the number first.
Run the most recent command starting with a string
!sys
This runs the most recent command that started with sys. In the example above, that would be systemctl restart nginx. Useful but slightly dangerous, since it runs immediately without confirmation. Use :p to preview first:
!sys:p
That prints the command without running it, and also adds it to your history so you can press up and edit it. There’s also a shell option that makes every ! expansion wait for confirmation instead of firing straight away. It is covered further down under histverify, and on a production box it is the setting I would turn on first.
Refer to arguments from the last command
ls /etc/nginx/conf.d
cd !$
!$ expands to the last argument of the previous command. So the second line becomes cd /etc/nginx/conf.d. This one saves a lot of typing.
To grab all arguments from the previous command, use !*:
echo one two three
printf "%s\n" !*
# expands to: printf "%s\n" one two three
Grab one specific argument

Arguments are numbered from zero, where zero is the command itself. Use !!:N to pull out any single one:
tar -czf backup.tar.gz /etc/nginx /var/www
ls -lh !!:2
# expands to: ls -lh backup.tar.gz
A few useful variations:
!^: the first argument!$: the last argument!!:2-3: a range of arguments!!:0: the command name itself
Fix a typo with quick substitution
Mistype a command and you do not need to retype the whole line. Use ^old^new to swap the first occurrence and rerun:
systemctl restart ngnix
^ngnix^nginx
The second line reruns as systemctl restart nginx. For a full substitution with every occurrence replaced, use the longer form:
!!:gs/old/new/
Drop the g and it changes only the first match, same as ^old^new.
Reverse Search: Ctrl+R
This is probably the single most useful history shortcut. Press Ctrl+R and start typing. Bash searches backward through your history in real time and shows the most recent match.
(reverse-i-search)`ngin': systemctl restart nginx
Press Ctrl+R again to cycle to the next match. Press Enter to run the command.
There are two ways out without running anything, and they behave differently. Ctrl+G aborts the search and restores whatever you had typed before you started. Escape ends the search but leaves the matched command sitting on your prompt, ready to edit. Escape is the one you want most of the time. A lot of guides describe both as “cancel,” which is misleading.
Once you are comfortable with Ctrl+R, it replaces most of the up-arrow scrolling you were doing before. It also scales to a 20,000 line history file in a way the up arrow never will.
Configuring History in ~/.bashrc
The default history settings are fine for casual use. On servers and workstations you spend serious time on, tuning them properly is important. Add or update these in your ~/.bashrc:
# Increase history size significantly
HISTSIZE=10000
HISTFILESIZE=20000

# Append to history instead of overwriting it
shopt -s histappend

# Expand ! shortcuts onto the prompt instead of running them immediately
shopt -s histverify

# Write and reload history after each command
PROMPT_COMMAND="history -a; history -c; history -r${PROMPT_COMMAND:+; $PROMPT_COMMAND}"

# Store timestamps
HISTTIMEFORMAT="%F %T  "

# Ignore duplicates and commands starting with a space
HISTCONTROL=ignoreboth

# Ignore common throwaway commands
HISTIGNORE="ls:ll:la:cd:cd -:pwd:exit:date:clear:history"
After editing, reload the file:
source ~/.bashrc
Let me break down the important ones.
histappend
Without this, each new shell session overwrites ~/.bash_history when it exits. If you have two terminals open and close one, the other session’s history gets wiped on exit. With histappend enabled, sessions append instead of overwrite. Much safer.
histverify
Small setting, and it prevents a specific class of accident. With histverify on, expansions like !!, !497, and !sys do not execute straight away. Bash expands them onto your prompt and waits for a second Enter. You get to read what is about to run before it runs.
shopt -s histverify
If you have ever typed !rm on a production box and felt your stomach drop while the terminal was still catching up, this is the setting you wanted.
PROMPT_COMMAND for real-time sync
By default, history only saves when you exit the shell. If your terminal crashes or you lose a session, those commands are gone. Setting PROMPT_COMMAND to run history -a; history -c; history -r after every command forces Bash to append new commands to the file, clear the in-memory list, and reload from disk. This keeps multiple open terminals in sync and protects against session loss.
Note: this adds a tiny bit of overhead per command. On modern hardware you will never notice it.
One catch to know before you rely on it. Because the file gets reloaded at every prompt, anything you delete from the in-memory list with history -d comes straight back on your next command unless you write the change to disk in the same breath. See the fix for that in the next section.
If that behavior bothers you, here’s a lighter variant:
PROMPT_COMMAND="history -a; history -n${PROMPT_COMMAND:+; $PROMPT_COMMAND}"
history -n reads only the lines appended to the file since this session started, instead of clearing the list and reloading the whole thing. Cheaper, and it leaves your in-memory list intact. The tradeoff is that it drifts further from one canonical view when several shells are writing at once. I run the -c; -r version. -n is the reasonable alternative if you delete entries often.
HISTTIMEFORMAT
Once you enable timestamps, history output looks like this:
  497  2026-03-14 09:22:11  tail -f /var/log/nginx/error.log
  498  2026-03-14 09:23:04  systemctl restart nginx
Extremely useful for auditing. On a shared server, knowing when a command was run is just as important as knowing what it was.
One thing here surprises people, so the mechanism is useful to understand. HISTTIMEFORMAT does two jobs. It sets the display format used by the history builtin, and its presence is what makes Bash write timestamps into the history file in the first place, marked with the history comment character. Entries recorded while it was unset have no stored timestamp at all. Enable it today and your older history will show a meaningless date rather than the real one. Set it once, then leave it set.
HISTCONTROL=ignoreboth
This combines two settings: ignoredups (skip consecutive duplicate commands) and ignorespace (skip any command that starts with a space). The space trick is handy when you need to run something sensitive and do not want it logged:
export AWS_SECRET_KEY=abc123
Note the leading space. That command will not appear in history.
Two caveats on that trick, and both matter. It only works when ignorespace is active, so test it on your machine before you trust it with anything real. And keeping a secret out of your history file does not keep it out of the environment. Once exported, every process you launch from that shell inherits the value, and anything able to read /proc/PID/environ as you or as root can see it.
There is a third value called erasedups, which strips every earlier copy of a command rather than only consecutive ones:
HISTCONTROL=ignoreboth:erasedups
It keeps the file tidy. It also reshuffles the ordering over time, so if you use history as a rough timeline of what you did and when, leave it off.
HISTIGNORE
Lets you define patterns to exclude from history entirely. The list above skips ls, cd, exit, and similar noise. Customize this to fit your workflow.
A trap here catches nearly everyone is that each pattern is anchored at the start of the line and has to match the entire line. Bash does not append an implicit * for you. So ls excludes a bare ls and nothing else. ls -l, ls -lh /var/log, and every other variation still land in your history.
To catch the arguments too, list both forms:
HISTIGNORE="ls:ls *:cd:cd *:pwd:exit:date:clear:history"
Resist the urge to shorten that to ls*. It is a glob, not a word, so it would quietly swallow lsof and lsblk as well.
Managing History
The history builtin takes a handful of flags that do the actual file work. These are the ones that come up day to day.
Write current session to disk immediately
history -a
Clear the in-memory history list
history -c
Reload history from the file
history -r
Delete a specific entry
history -d 497
Removes line 497 from the in-memory list. That is only half the job. The entry may already be sitting in ~/.bash_history on disk, and if you are running the PROMPT_COMMAND sync described above, the next prompt reloads the file and brings it right back. Write the change out in the same command:
history -d 497 && history -w
Use history -w deliberately, though. It does not merge anything. It overwrites the history file with the current shell’s list. If other sessions have appended lines since your last reload, those lines are gone. On a busy jump box, close the other shells first or accept the loss.
If what you deleted was a real credential, rotate it. Do not treat a history edit as containment. The value is likely still in your scrollback, in your terminal emulator’s buffer, and possibly in whatever log the command itself wrote.
Delete the entire history file
history -c && history -w
-c clears in-memory history, -w writes the (now empty) list to disk, effectively wiping the file.
Turn history off for a session
Sometimes the cleanest option is to not record at all:
set +o history
# commands here are not recorded
set -o history
Useful during a maintenance window where you are pasting tokens over and over. unset HISTFILE does something similar by preventing the write to disk at exit, though the commands still sit in memory for the life of the shell.
Sharing History Across Multiple Terminals
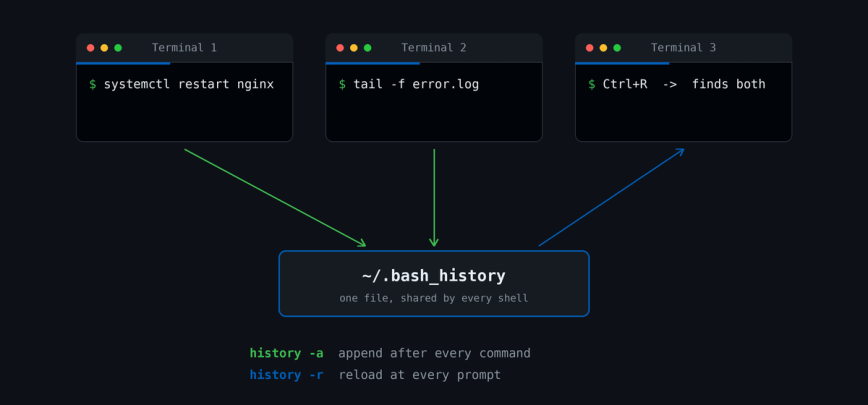
This is one of the more frustrating default behaviors. Open three terminals. Run commands in each. Close them all. The only history that survives is from whichever one closed last, unless you have histappend and the PROMPT_COMMAND sync setup described above.
With that configuration in place, every command gets written to ~/.bash_history immediately after you run it, and every new prompt reloads the file. So pressing Ctrl+R in terminal two will find commands you just ran in terminal three.
Nmmote that up arrow no longer walks back through only what you typed in this window. It walks back through everything, from every window, interleaved. Some people find that maddening. Try it for a week before you decide either way.
Using a Separate History File
You can point HISTFILE at a different location. Useful if you want to keep a longer audit trail somewhere outside of your home directory, or if you want project-specific histories:
export HISTFILE=~/.bash_history_server1
Some people keep their history file in a synced directory so it is available across machines. I would be cautious about that unless the sync is encrypted, since history files often contain hostnames, usernames, partial paths, and other information you might not want in a cloud sync.
While you are in there, check the permissions:
ls -l ~/.bash_history
It should be 0600, and on most distros it already is. Give it a look anyway if the home directory lives on NFS, gets backed up somewhere with looser permissions, or syncs to another machine, because those are the routes by which a private file quietly stops being private:
chmod 600 ~/.bash_history
Searching History with fzf
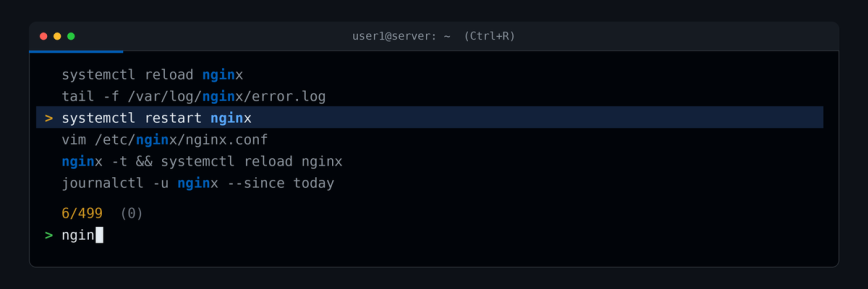
If you want a significantly better Ctrl+R experience, install fzf, a command-line fuzzy finder. It replaces the default reverse search with an interactive, filterable list.
# Ubuntu/Debian
sudo apt install fzf

# Fedora
sudo dnf install fzf

# Arch
sudo pacman -S fzf
Then add a single line to ~/.bashrc:
eval "$(fzf --bash)"
EDIT: this used to mean sourcing key-bindings.bash from a path that was different on every distro, and plenty of guides still tell you to do it that way. The fzf --bash flag replaced all of that and works no matter how you installed. If your version is old enough that fzf --bash throws an error, upgrade the package rather than going hunting for the script path.
Now pressing Ctrl+R opens an interactive list of your full history. Type any part of the command, not just the beginning, and fzf filters in real time. One behavior that catches people out: Enter does not run the selected command. It pastes it onto your prompt. Press Enter a second time to run it. That extra beat has saved me more than once.
A few bindings once you are in there:
Ctrl+Ragain: toggle between relevance and chronological orderTab: select multiple commands at onceShift+Delete: remove the highlighted command from your history
Note: fzf also integrates with Ctrl+T for file path completion and Alt+C for directory jumping. Worth a look once the history search feels natural.
Atuin, if you want to go further
Atuin is the heavier option. It replaces Ctrl+R with a SQLite-backed history that records exit code, working directory, and duration for every command, and it can sync end-to-end encrypted across machines. That is a real advantage on a fleet of servers where you want one searchable history.
It also takes over your history handling completely, which is a bigger commitment than adding one line for fzf. If fzf already solves your problem, stop at fzf.
Practical Bash History Shortcuts
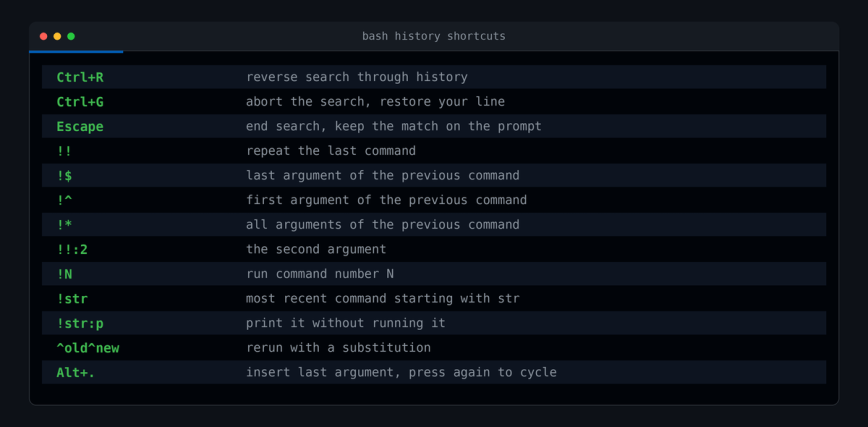
Ctrl+R: reverse search through history!!: repeat the last command!$: last argument of the previous command!^: first argument of the previous command!*: all arguments of the previous command!!:2: the second argument of the previous command!N: run command number N from history!string: run the most recent command starting with string!string:p: print the command without running it^old^new: rerun the last command with a substitutionCtrl+P/Ctrl+N: previous/next command (same as up/down arrows)Alt+.: insert the last argument of the previous command (repeatable)
Alt+. is the one I reach for most. Press it once to get the last argument of the previous command. Press it again to get the last argument of the command before that. It cycles backward through your history’s last arguments. Very handy for things like mkdir /some/long/path && cd then pressing Alt+. to fill in the path.
History on Shared or Production Servers
On servers where multiple admins have access, history becomes a loose audit trail. It is not a replacement for proper audit logging with tools like auditd, but it helps. A few things to keep in mind:
- Each user has their own
~/.bash_history. If you are all sharing a single account (bad practice, but it happens), history gets messy fast. - Timestamps via
HISTTIMEFORMAThelp reconstruct a timeline of what was run and when. They say nothing about who. Attribution comes from knowing whose history file you are reading, which is exactly what a shared account destroys. - The
lastcommand combined with history timestamps lets you correlate commands with login sessions. Neither is an execution log, so treat what you find as a lead rather than a finding. See post-installation server setup for more on hardening and auditing. - Never rely on history as a security control. Users can clear it, disable it, or use
unset HISTFILEto disable logging for a session.
For serious audit requirements, look at auditd or a centralized logging setup. History is useful, not authoritative.
Putting It All Together
Here is the full block I run, ready to drop into ~/.bashrc:
# Bash History Configuration
HISTSIZE=10000
HISTFILESIZE=20000
HISTTIMEFORMAT="%F %T  "
HISTCONTROL=ignoreboth
HISTIGNORE="ls:ll:la:cd:cd -:pwd:exit:date:clear:history"

shopt -s histappend
shopt -s histverify

# Sync history across terminals after every command
PROMPT_COMMAND="history -a; history -c; history -r${PROMPT_COMMAND:+; $PROMPT_COMMAND}"
The PROMPT_COMMAND line is written carefully to avoid clobbering any existing value. If you already have something set in PROMPT_COMMAND, this appends to it rather than replacing it.
Apply it:
source ~/.bashrc
If you want this system-wide for all users, add it to /etc/bash.bashrc or a file under /etc/profile.d/. Keep in mind that changes there affect every user on the system, so test carefully first.
Conclusion
Bash history is one of those areas where a small investment in configuration pays off every single day. Larger history size, timestamp logging, real-time sync across terminals, and a decent search tool like fzf will save you a meaningful amount of time and frustration.
If you take only two things from this, take these. Turn on histappend so you stop quietly losing history every time you close a terminal. Turn on histverify so a stray ! never runs something you did not get to read first. The rest is refinement.
The shortcuts are worth drilling until they are automatic, Ctrl+R, !!, !$, and Alt+. in particular. They change how fast you move at the command line.


Nice article, I learned new stuff
Finally got a chance to read through this, excellent article as always! There was an early topic on the forums about what your most used “command” is. My answer is
Ctrl+R; I feel like I rely on that more than I do anything else!There have been times where I could have sworn I ran a specific command, only to find that it’s not in my history anywhere! I’ll be updating all of my
~/.bashrcfiles to include:This seems like enough for me test and see if this fits my use cases, thanks for posting this article!
I haven’t used ALL of the features of bash history, but the ones I use have been fine tuned since 1995, when I gradually started moving from ksh to bash. Since I’ve had a history with sh going back to 1982 and ksh since the mid to late eighties, I’ve definitely had a preference toward sh-based shells.
When I did get to use csh I liked the fact that it had easy command recall, but it was terrible for use with scripts, so I was delighted when I started using ksh. However, in the mid to late 1990s, probably somewhere around 1997, bash caught up to ksh in capabilities and shortly thereafter exceeded ksh, especially once it received high exposure with increasingly popular Linux systems.
I tried zsh and tcsh too. Once again with tcsh, too bad that the scripting language is so terrible; otherwise I felt that in the interactive space at the last point that I used exclusively UNIX systems in the workplace AND had access to them as a super user tcsh ran well then. So did zsh, but not so much to raise it’s appeal and replace bash.
While I’m on the topic, I experimented with fish in the past week. The Endeavour OS instance of fish is the only place where I experienced a satisfactory experience; I couldn’t get it to do anything useful on MX Linux at all, so that told me enough - if it can’t be easily installed and configured universally, it’s not worth the effort at all.
Anyway, back to your work; it’s an excellent essay on what you can do with Bash and particularly with Bash history - another winning article in your collection!