Linux Kernel Parameters Tuning for Better Performance
This morning I sat down to update my Kali workstation running XFCE4, and instead of a quick sudo apt update && sudo apt full-upgrade -y I ended up reinstalling from scratch. Took about the same time as the upgrade would have, since I hadn’t updated in a while. Fresh install, dark wallpaper, kali-desktop-i3 layered on top of the XFCE4 base, and I was back in business.
While the packages were downloading I started poking at kernel parameters, which is what got me thinking about this guide. Desktop or server, most people never touch /proc/sys. On a laptop that’s fine. On a server under real load, a few of those defaults are worth knowing about, and a few are worth leaving exactly where they are.
Most Linux servers run with their default kernel parameters. That’s fine for general workloads, but once you start pushing a server harder, those defaults leave real performance on the table. sysctl is the tool that lets you read and write kernel parameters at runtime, and /proc/sys is where those parameters actually live.
This guide covers the most useful tunables for network throughput, memory management, file I/O, and general server performance. I’ll show you how to apply changes safely, make them permanent, and verify they’re doing what you expect.
What Is sysctl?
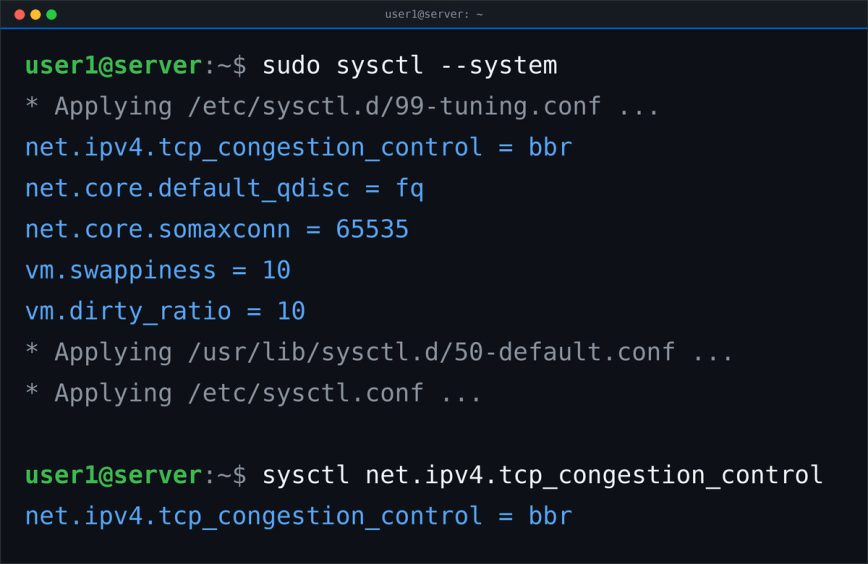
sysctl is a utility for examining and changing kernel parameters while the system is running. No reboot required. The parameters are exposed as files under /proc/sys/, organized into subdirectories by category.
To list all current parameters:
sysctl -a
To read a specific parameter:
sysctl net.ipv4.tcp_syncookies
To set a parameter temporarily (does not survive reboot):
sudo sysctl -w net.ipv4.tcp_syncookies=1
To make changes permanent, add them to /etc/sysctl.conf or a file under /etc/sysctl.d/. The preferred approach on modern systems is a separate file:
sudo nano /etc/sysctl.d/99-tuning.conf
After editing, apply without rebooting:
sudo sysctl --system
Or reload a specific file:
sudo sysctl -p /etc/sysctl.d/99-tuning.conf
You can also read parameters directly from /proc/sys. Slashes in the path replace dots in the sysctl name. So net.ipv4.tcp_syncookies lives at:
cat /proc/sys/net/ipv4/tcp_syncookies
Both approaches read the same kernel values. sysctl is just more convenient.
Network Performance Tuning
This is where careful tuning can pay off, but it’s also where people cargo-cult values they don’t need. Modern kernels autotune TCP receive buffers within the range you set, so raising the ceilings only helps when the connection is actually bandwidth-limited on a high-latency path. If you’re moving large amounts of data over long distances, these settings matter. For a typical web server on a low-latency network, the defaults are usually fine.
TCP Buffer Sizes
The kernel uses receive and send buffers for TCP connections. The defaults are conservative:
sysctl net.core.rmem_default
net.core.rmem_default = 212992

sysctl net.core.wmem_default
net.core.wmem_default = 212992
That’s about 208 KB. For high-bandwidth, high-latency transfers, larger maximums let the autotuning grow the window further. These are ceilings, not targets. The kernel won’t allocate 64 MB per socket unless a connection genuinely needs it:
# /etc/sysctl.d/99-tuning.conf

# TCP socket receive buffer (min, default, max) in bytes
net.ipv4.tcp_rmem = 4096 87380 67108864

# TCP socket send buffer (min, default, max) in bytes
net.ipv4.tcp_wmem = 4096 65536 67108864

# Core socket receive/send buffer maximums
net.core.rmem_max = 67108864
net.core.wmem_max = 67108864
net.core.rmem_default = 262144
net.core.wmem_default = 262144
The three values in tcp_rmem and tcp_wmem are the minimum, default, and maximum. The kernel adjusts buffer sizes dynamically within this range based on demand.
TCP Congestion Control
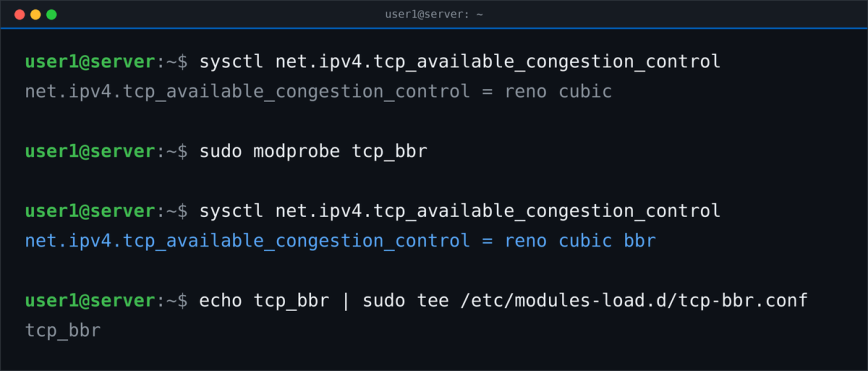
BBR (Bottleneck Bandwidth and Round-trip propagation time) is Google’s TCP congestion control algorithm. It can outperform the default cubic on high-latency or lossy links, though it isn’t universally faster. Benchmark it against your existing algorithm before committing. First, check what’s available on your system:
sysctl net.ipv4.tcp_available_congestion_control
net.ipv4.tcp_available_congestion_control = reno cubic bbr
On many distributions BBR ships as a module and won’t appear in that list until you load it. If you don’t see bbr, load the module and check again:
sudo modprobe tcp_bbr
sysctl net.ipv4.tcp_available_congestion_control
To load it automatically at boot, add it to /etc/modules-load.d/:
echo tcp_bbr | sudo tee /etc/modules-load.d/tcp-bbr.conf
Once BBR is available, enable it:
net.ipv4.tcp_congestion_control = bbr
net.core.default_qdisc = fq
fq (fair queuing) is the recommended packet scheduler when using BBR, since BBR relies on pacing. Whether the pair helps depends on your traffic and network path, so measure it rather than assuming. BBR requires kernel 4.9+, which you almost certainly have if you’re running anything recent.
SYN Backlog and Connection Handling
Under heavy traffic, the default connection queues fill up quickly. This causes connection refusals before your application even sees the request:
# Maximum number of half-open connections in the SYN queue
net.ipv4.tcp_max_syn_backlog = 8192

# Maximum number of connection requests queued before the application accepts them
net.core.somaxconn = 65535

# Maximum number of packets queued on the INPUT side
net.core.netdev_max_backlog = 16384
Enable SYN cookies to protect against SYN flood attacks at the same time:
net.ipv4.tcp_syncookies = 1
TIME_WAIT and Connection Recycling
Servers handling lots of short-lived connections (HTTP APIs, for example) can accumulate thousands of sockets in TIME_WAIT state. Check your current count:
ss -s | grep TIME-WAIT
Two things worth understanding here, because both are commonly misused.
tcp_tw_reuse lets the kernel reuse a TIME_WAIT socket for a new connection. The important catch: it only applies to outgoing connections, so it helps a server making lots of connections out (a reverse proxy talking to backends, for example) and does nothing for inbound client connections to your web server. The default is 2 (loopback only), and the kernel documentation says not to change it without a specific reason. It’s an advanced, workload-specific setting, not a general baseline:
# Advanced: reuse TIME_WAIT sockets for outbound connections only
# Default is 2 (loopback). Set deliberately, not by habit.
net.ipv4.tcp_tw_reuse = 1
tcp_max_tw_buckets caps the number of TIME_WAIT sockets. This limit exists as basic DoS protection, so lowering it is the wrong instinct. If you legitimately need more, raise it, and make sure you have the memory to back it:
net.ipv4.tcp_max_tw_buckets = 262144
Keepalive Tuning
Keepalive is dead-peer detection, not a performance optimization, and it only kicks in for applications that enable SO_KEEPALIVE on their sockets. The kernel defaults are 2 hours idle, 75 seconds between probes, and 9 probes. Shortening them detects dead connections faster, which frees the file descriptors and memory those stale sockets hold. Shorten them with care, since aggressive values can tear down connections that are simply idle:
# Start sending keepalives after 60 seconds of idle (default: 7200)
net.ipv4.tcp_keepalive_time = 60

# Interval between keepalive probes
net.ipv4.tcp_keepalive_intvl = 10

# Number of probes before declaring connection dead
net.ipv4.tcp_keepalive_probes = 6
Memory Management
If you’ve read the Linux swap space guide on this blog, you already know that swappiness and cache pressure matter. Here’s the full picture.
Swappiness
Controls how aggressively the kernel moves anonymous memory pages to swap. The default is 60. The right value is workload-dependent and the range is 0 to 200, so there’s no single correct number to paste onto every server. Check what you’re running now:
cat /proc/sys/vm/swappiness
For a latency-sensitive server where you’d rather keep pages in RAM, a lower value like 10 tells the kernel to prefer RAM and swap only when it has to:
vm.swappiness = 10
A value of 1 is the lowest useful setting without disabling swap entirely. On modern kernels, 0 means the kernel avoids swapping unless it has no other option (on kernels before 3.5 it effectively disabled swapping). Test with your actual workload before settling on a number.
VFS Cache Pressure
Controls how aggressively the kernel reclaims memory used for inode and dentry caches (the directory/file metadata cache). Lower values keep more of this cache in memory, which speeds up filesystem operations:
vm.vfs_cache_pressure = 50
The default is 100. On a server with plenty of RAM and a workload that touches many files frequently (a file server or a busy web root, say), reducing this to 50 keeps more metadata cached. This is workload-specific, not a universal win. Don’t go too low on memory-constrained systems, and never set it to 0, which stops the kernel reclaiming that cache at all and can trigger OOM conditions.
Dirty Page Writeback
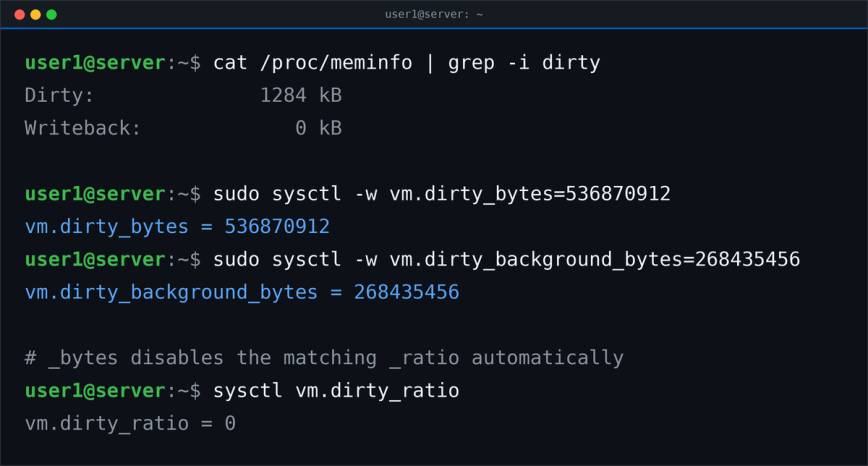
These control how aggressively the kernel flushes dirty pages (modified data waiting to be written to disk) to storage. Relevant on servers with write-heavy workloads:
# Percentage of RAM dirty before the kernel blocks writes to flush (hard limit)
vm.dirty_ratio = 10

# Percentage of RAM that can be dirty before background writeback starts
vm.dirty_background_ratio = 5

# How long data stays dirty before being written (in centiseconds, default 3000 = 30s)
vm.dirty_expire_centisecs = 1500

# How often the writeback daemon wakes up (centiseconds, default 500 = 5s)
vm.dirty_writeback_centisecs = 250
dirty_expire_centisecs doesn’t guarantee data sits unwritten for 30 seconds. It sets when dirty pages become old enough for the flusher threads to write them out. Reducing it makes writeback happen more often, at a small throughput cost.
One thing to be clear about: writeback timing is not a durability guarantee. It does not protect against sudden power loss. Durability comes from the application doing fsync() or fdatasync(), journaling, battery-backed write caches, and a UPS. Treat these ratios as a throughput and latency knob, not a safety net.
There’s also a scale trap with the percentage-based ratios. On a 4 GB VPS, dirty_ratio = 10 is about 400 MB, which flushes quickly. On a 256 GB server it’s roughly 25 GB, and flushing that in one go can stall the system with a massive I/O spike. On large-memory machines, set absolute caps instead:
# Absolute byte limits instead of percentages (better for high-RAM systems)
vm.dirty_bytes = 536870912          # 512 MB hard limit
vm.dirty_background_bytes = 268435456   # 256 MB background threshold
Setting the _bytes form to a non-zero value disables the matching _ratio form, so use one pair or the other, not both.
Overcommit Behavior
The default (vm.overcommit_memory = 0) allows heuristic overcommit. This works well for most workloads. But for specific applications:
# 0 = heuristic (default)
# 1 = always allow overcommit (useful for some scientific/HPC workloads)
# 2 = never overcommit beyond physical RAM + swap
vm.overcommit_memory = 0
The Redis documentation recommends setting this to 1 to avoid background save failures. Leave it at 0 unless you have a specific reason to change it.
File Descriptor and Process Limits
High-traffic servers can hit the file descriptor limit long before they hit CPU or memory limits. Nginx, Node.js, and databases all open many file descriptors per connection.
Maximum Open Files
# System-wide file descriptor limit
fs.file-max = 2097152
Before changing this, check whether you’re actually near the ceiling:
cat /proc/sys/fs/file-nr
The three values are: allocated file handles, unused allocated handles, and the maximum. If the first value is nowhere near the third, raising fs.file-max does nothing for you. Treat this as a monitoring-driven change, not a default to set blindly.
fs.nr_open (the per-process ceiling) is already 1048576 on current kernels, so there’s usually no reason to put it in your tuning file. Raise it only if a specific process needs a higher ulimit -n than the default allows.
Note: The kernel limit set here is the ceiling. You also need to set LimitNOFILE in your systemd service units, or use ulimit -n for non-systemd processes. The kernel limit alone isn’t enough.
Inotify Limits
If you run applications that watch files (like build tools, IDEs on a remote server, or monitoring agents), you may hit inotify limits:
fs.inotify.max_user_watches = 524288
fs.inotify.max_user_instances = 512
The symptom when you hit these limits is usually an error like “too many open files” or “inotify watch limit reached” in application logs.
Security-Related Tunables
Some sysctl parameters are as much about security as performance. Worth having in your standard baseline config.
# Ignore ICMP broadcast requests (Smurf attack protection)
net.ipv4.icmp_echo_ignore_broadcasts = 1

# Ignore bogus ICMP error responses
net.ipv4.icmp_ignore_bogus_error_responses = 1

# Reverse path filtering (helps prevent IP spoofing)
# 1 = strict, 2 = loose. Use 2 for asymmetric/multihomed routing.
net.ipv4.conf.all.rp_filter = 1
net.ipv4.conf.default.rp_filter = 1

# Disable IP source routing
net.ipv4.conf.all.accept_source_route = 0
net.ipv4.conf.default.accept_source_route = 0

# Disable ICMP redirect acceptance
net.ipv4.conf.all.accept_redirects = 0
net.ipv4.conf.default.accept_redirects = 0
net.ipv6.conf.all.accept_redirects = 0

# Don't send ICMP redirects (not a router)
net.ipv4.conf.all.send_redirects = 0

# Log martian packets (packets with impossible source addresses)
net.ipv4.conf.all.log_martians = 1
Warning: strict reverse-path filtering (1) can break asymmetric routing, policy routing, VPNs, and some multihomed or network-appliance setups. If your traffic can legitimately arrive on a different interface than it leaves, use loose mode (2) instead.
If your server is not acting as a router, you may want to disable IPv4 forwarding:
net.ipv4.ip_forward = 0
Be aware that changing ip_forward is not a neutral toggle. The kernel resets several IPv4 configuration parameters to their host or router defaults when this value changes, so set it deliberately. If the box is a router or runs Docker, you’ll want it at 1. Docker can enable forwarding when the daemon starts, though the exact behavior depends on the firewall backend. Its newer nftables backend does not enable forwarding itself.
A Complete Baseline Config
Here’s a consolidated config to use as a starting point, not a paste-and-forget baseline. The network buffer sizes, swappiness, cache pressure, and dirty-page settings are all workload-dependent, so read the sections above before applying them and benchmark anything you’re unsure about. Save it to /etc/sysctl.d/99-tuning.conf:
# /etc/sysctl.d/99-tuning.conf
# LinuxBlog.io sysctl starting point - review before applying

## Network: TCP buffer sizes
net.ipv4.tcp_rmem = 4096 87380 67108864
net.ipv4.tcp_wmem = 4096 65536 67108864
net.core.rmem_max = 67108864
net.core.wmem_max = 67108864
net.core.rmem_default = 262144
net.core.wmem_default = 262144

## Network: Congestion control (requires kernel 4.9+ for BBR)
net.ipv4.tcp_congestion_control = bbr
net.core.default_qdisc = fq

## Network: Connection handling
net.ipv4.tcp_max_syn_backlog = 8192
net.core.somaxconn = 65535
net.core.netdev_max_backlog = 16384
net.ipv4.tcp_syncookies = 1

## Network: TIME_WAIT
# tcp_tw_reuse omitted here - it is outbound-only and default 2. Set it
# deliberately per-workload, not as a baseline (see the TIME_WAIT section).
net.ipv4.tcp_max_tw_buckets = 262144

## Network: Keepalive
net.ipv4.tcp_keepalive_time = 60
net.ipv4.tcp_keepalive_intvl = 10
net.ipv4.tcp_keepalive_probes = 6

## Memory
vm.swappiness = 10
vm.vfs_cache_pressure = 50
vm.dirty_ratio = 10
vm.dirty_background_ratio = 5
vm.dirty_expire_centisecs = 1500
vm.dirty_writeback_centisecs = 250

## File descriptors (raise only if file-nr shows you're near the ceiling)
fs.file-max = 2097152
fs.inotify.max_user_watches = 524288

## Security
net.ipv4.icmp_echo_ignore_broadcasts = 1
net.ipv4.icmp_ignore_bogus_error_responses = 1
# rp_filter: use 2 (loose) if you have asymmetric/multihomed routing
net.ipv4.conf.all.rp_filter = 1
net.ipv4.conf.default.rp_filter = 1
net.ipv4.conf.all.accept_source_route = 0
net.ipv4.conf.all.accept_redirects = 0
net.ipv6.conf.all.accept_redirects = 0
net.ipv4.conf.all.send_redirects = 0
net.ipv4.conf.all.log_martians = 1
Apply it immediately:
sudo sysctl -p /etc/sysctl.d/99-tuning.conf
How to Test That Changes Are Working
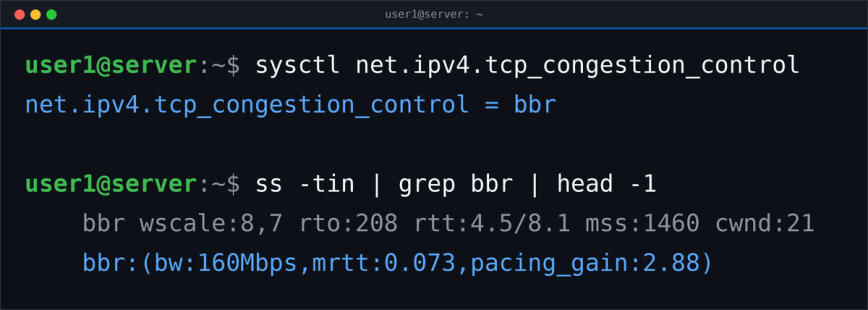
Never assume a change did what you expected. Verify every parameter after applying:
sysctl net.ipv4.tcp_congestion_control
net.ipv4.tcp_congestion_control = bbr
Confirm BBR is actually active on established connections:
ss -tin | grep bbr | head -5
Check the file descriptor situation under load:
cat /proc/sys/fs/file-nr
Monitor dirty page activity:
cat /proc/meminfo | grep -i dirty
If something misbehaves after applying changes, dmesg is a useful troubleshooting check (it’s not a verification that tuning worked, just a place complaints show up):
sudo dmesg | tail -20
Match the tool to what you’re testing. Use iperf3 between two hosts for raw network throughput. Use ss -s and ss -tin for TCP state and congestion-control behavior. Use vmstat, iostat, and sar for system-level behavior over time. And for anything that matters, use an application-specific benchmark: wrk or ab (Apache Bench) for a web server, your database’s own load tools for a database. There’s no substitute for measurement. What helps one workload can hurt another.
Distro-Specific Notes
A few things vary between distributions worth calling out.
Ubuntu/Debian: Use /etc/sysctl.d/ for custom files. Files are processed in lexical order, so a high-numbered name like 99-tuning.conf generally causes it to load after lower-numbered files. It’s not a guarantee of loading dead last, since another 99-* or later file can still follow it, but in practice it’s enough to override the usual distro defaults.
RHEL/Fedora/CentOS: Same /etc/sysctl.d/ directory applies. Recent RHEL releases ship improved defaults and may already enable BBR, so check what’s set on your exact version with sysctl -a before duplicating anything.
Containers and VMs: Some parameters (especially network tunables) may be set at the host level and not be writable from within a container. In Docker containers, the host kernel parameters apply to all containers. In VMs, you have full control as long as the hypervisor doesn’t restrict it.
Note: Cloud providers like AWS, GCP, and DigitalOcean sometimes pre-tune some of these values on their images. Run sysctl -a on a fresh instance and compare against the defaults before blindly applying a tuning file.
What Not to Touch
A few parameters look tempting but cause more problems than they solve.
net.ipv4.tcp_tw_recycle was removed in kernel 4.12 entirely. On older kernels it caused dropped connections for clients behind NAT. Don’t use it.
vm.overcommit_memory = 1 can mask memory leaks and make OOM kills harder to predict. Only set it if you know exactly why you need it.
Huge pages (vm.nr_hugepages) can help database servers like MySQL and PostgreSQL significantly, but misconfiguring them can, depending on how the application is set up to use them, prevent services from starting if the kernel can’t allocate the requested pool. That’s a separate topic worth its own guide.
Also, see the Linux Server Setup guide and the notes on SSD performance tuning for other areas where kernel defaults affect hardware longevity and throughput.
Conclusion
The default Linux kernel configuration is conservative by design. It has to work reasonably well on everything from a Raspberry Pi to a 256-core server. For any specific workload, you can do better.
Start with the network buffer and congestion control settings if you’re running anything internet-facing. Add the swappiness and cache pressure tweaks for any server that runs long-term. Layer in the security hardening settings as a baseline everywhere.
Make changes one section at a time. Measure before and after. Keep a copy of the original defaults so you can roll back. And put your final tuning file in version control or your configuration management system so it follows every new server you provision automatically.
Also see: Linux Commands frequently used by Linux Sysadmins – Part 5 for related system administration tools, and the kernel sysctl documentation for the full parameter reference.


Great article (as usual ) But, you forgot to mention for most of the commands you either need to run as
sudoor asrootthanks for the article Hydn, I’m already set few of kernel parameters and it make real different affect speed and power usage of my machine