Linux ssh-keygen: Set Up SSH Key Authentication the Right Way
Password-based SSH login is convenient. It’s also one of the fastest ways to get a server compromised. Stand up a VPS with a public IP and password auth left on, then tail the auth log for an hour. You’ll watch bots work through root, admin, ubuntu, deploy, test, and a few thousand passwords for each. SSH key authentication removes password guessing from the equation entirely, because there’s no password to send.
This guide covers generating a key pair, copying the public key over, testing it, disabling password login safely, and the client-side config that makes all of it painless day to day. If you’re new to the SSH client itself, SSH command in Linux, with examples covers the basics.
How SSH Key Authentication Works
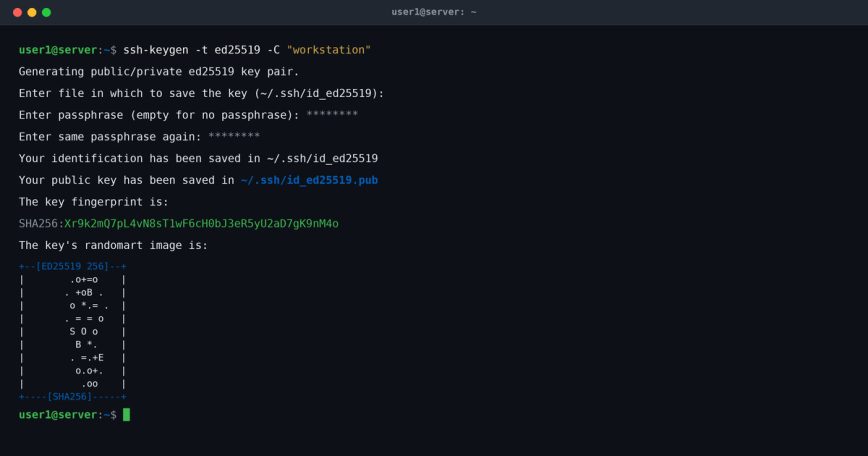
The idea is simple. You generate a key pair: a private key that stays on your local machine, and a public key that goes on the server. When you connect, the server challenges your client to prove it holds the private key. No password ever travels over the wire.
The private key is yours. Guard it like a password. The public key can be freely distributed; it’s useless without the private key to match it.
Generate Your SSH Key Pair
Run this on your local machine, not the server.
ssh-keygen -t ed25519 -C "your_email_or_label"
ed25519 is the modern choice. Faster, shorter keys, and stronger than RSA at comparable sizes. OpenSSH has supported it since version 6.5, released in early 2014, so anything you’re likely to touch handles it. If you do hit an old appliance or a legacy jump box that doesn’t, fall back to RSA at 4096 bits:
ssh-keygen -t rsa -b 4096 -C "your_email_or_label"
If you own a YubiKey or another FIDO2 security key, OpenSSH can back the key with that hardware using the -sk key types:
ssh-keygen -t ed25519-sk -C "your_email_or_label"
The private key half is now useless without the physical device, and each login needs a touch on the key to confirm. A stolen key file gets an attacker nowhere. This needs OpenSSH 8.2 or newer on both ends. If your security key is an older U2F model that doesn’t do ed25519-sk, use ecdsa-sk instead. Everything else in this guide works the same way with these keys.
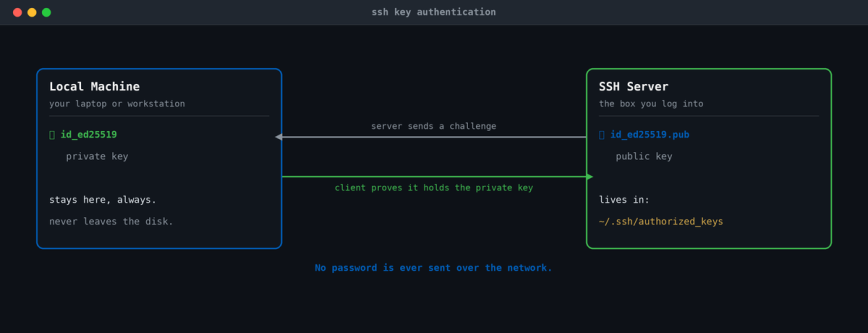
You’ll be asked where to save the key. The default (~/.ssh/id_ed25519) is fine for most setups. If you manage multiple servers or identities, use a custom name:
Enter file in which to save the key (/home/user/.ssh/id_ed25519): /home/user/.ssh/myserver_ed25519
Then you’ll be prompted for a passphrase. Use one. A passphrase encrypts the private key on disk. If someone gets your private key file, the passphrase is the last line of defense. It doesn’t affect the login flow much because ssh-agent handles it after the first unlock (more on this below).
After generation, you’ll have two files:
~/.ssh/id_ed25519: the private key. Never share this, never copy it to a server.~/.ssh/id_ed25519.pub: the public key. This is the one that goes on the server.
Copy the Public Key to the Server
The easiest method is ssh-copy-id:
ssh-copy-id -i ~/.ssh/id_ed25519.pub user@your_server_ip
This appends your public key to ~/.ssh/authorized_keys on the server and sets the correct permissions automatically. You’ll be prompted for your password this one last time.
On macOS, the version of ssh-copy-id that ships with the system is fine, but it’s easy to miss that the flag is the same: point -i at the .pub file, not the private key. If ssh-copy-id isn’t available at all (some minimal Linux installs strip it out), do it manually:
cat ~/.ssh/id_ed25519.pub | ssh user@your_server_ip "mkdir -p ~/.ssh && chmod 700 ~/.ssh && cat >> ~/.ssh/authorized_keys && chmod 600 ~/.ssh/authorized_keys"
Permissions matter here. SSH is strict about this. If ~/.ssh is world-writable or authorized_keys is too permissive, SSH will silently ignore the key.
Correct permissions:
chmod 700 ~/.ssh
chmod 600 ~/.ssh/authorized_keys
Ownership catches people out just as often. If you created the directory as root, say by using sudo to drop a key into a new user’s home directory, that user can’t read their own authorized_keys and the login fails with nothing useful in the client output:
sudo chown -R user:user /home/user/.ssh
Linux File Permissions Explained: chmod, chown, and umask in Practice covers the model underneath if any of that is unfamiliar.
Test the Connection Before Locking Anything Down
This step is critical. Before you disable password login, verify the key works. Open a new terminal window and connect:
ssh -i ~/.ssh/id_ed25519 user@your_server_ip
If you’re prompted for your key passphrase (not a server password) and get in, you’re good. Do not close your existing session yet.
If the key isn’t being picked up automatically, add verbose output to see what’s happening:
ssh -vvv -i ~/.ssh/id_ed25519 user@your_server_ip
Look for lines like Offering public key and Server accepts key. If you see Permission denied (publickey), the key isn’t in authorized_keys or the permissions are wrong.
The client only tells you that it failed. The server tells you why. From your still-open session:
sudo journalctl -t sshd -n 50
Using -t sshd rather than -u means this works regardless of what the service unit is called on your distribution. Look for Authentication refused: bad ownership or modes, which is the permissions problem spelled out plainly. On Debian and Ubuntu systems that still run rsyslog, the same lines land in /var/log/auth.log, so sudo tail -f /var/log/auth.log works too. More on reading logs in journalctl: The Complete Guide to Reading Linux System Logs and Linux Log Files: Guide to Reading, Searching, and Managing Logs.
Disable Password Authentication
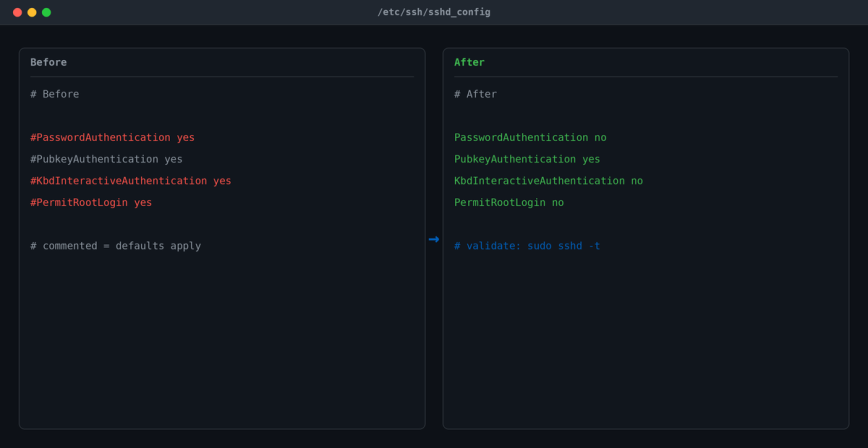
Once key login is confirmed, lock down the server. Edit the SSH daemon config:
sudo nano /etc/ssh/sshd_config
Find and set these directives:
# Before
#PasswordAuthentication yes
#PubkeyAuthentication yes
#PermitRootLogin yes
# After
PasswordAuthentication no
PubkeyAuthentication yes
KbdInteractiveAuthentication no
PermitRootLogin no
KbdInteractiveAuthentication no is the one that gets skipped. On distributions that run SSH auth through PAM, setting PasswordAuthentication no on its own can leave a keyboard-interactive path open that prompts for the same password you thought you’d just disabled. Set both. On older releases this directive was called ChallengeResponseAuthentication, so if sshd -t complains, that’s why.
PermitRootLogin no is worth setting while you’re here. Root login over SSH is a bad habit. Use a regular user and sudo when you need escalation. See Generating Secure Passwords for your Linux Server for related hardening tips.
Before you reload, check the drop-in directory. On Debian, Ubuntu and most current distributions, /etc/ssh/sshd_config opens with an Include /etc/ssh/sshd_config.d/*.conf line. Because sshd uses the first value it finds for any given directive, anything in those drop-in files wins over what you just edited further down the main file:
ls /etc/ssh/sshd_config.d/
grep -r PasswordAuthentication /etc/ssh/sshd_config /etc/ssh/sshd_config.d/
Cloud images are the usual culprit. DigitalOcean, AWS, Hetzner and others ship a 50-cloud-init.conf that sets PasswordAuthentication explicitly. Edit that file, or your change to the main config does nothing at all and you’ll be left wondering why passwords still work.
Validate the config before you reload anything. A typo in sshd_config is one of the more common ways people lock themselves out of a box:
sudo sshd -t
No output means no syntax errors. Now reload:
sudo systemctl reload ssh
Debian-based systems usually use ssh.service, while Fedora, RHEL, Arch and most others use sshd.service. If one errors out, the other is the right name. Reload rather than restart, since reload re-reads the config without dropping connections that are already established.
Test again from a new terminal before closing your existing session. If something’s wrong, that old session is still authenticated and you can put things back. For hardening beyond authentication, see SSH Security: Protecting Your Linux Server from Threats.
Managing Multiple Keys with ~/.ssh/config
Once you start managing more than one server, typing out -i ~/.ssh/keyname user@ip gets old fast. The SSH client config file fixes this.
Create or edit ~/.ssh/config:
Host myserver
    HostName 192.168.1.100
    User deploy
    IdentityFile ~/.ssh/myserver_ed25519
    Port 2222

Host staging
    HostName staging.example.com
    User ubuntu
    IdentityFile ~/.ssh/staging_ed25519
Now instead of:
ssh -i ~/.ssh/myserver_ed25519 -p 2222 deploy@192.168.1.100
You just type:
ssh myserver
Host aliases apply to anything that uses the SSH client underneath, so scp myserver:/var/log/nginx/error.log . works with no flags, and so does rsync -av myserver:/srv/backups/ ./backups/. Worth reading if you move files around often: SCP Linux: Securely Copy Files Using SCP examples and rsync Over SSH.
Set the permissions on the config file:
chmod 600 ~/.ssh/config
Using ssh-agent to Avoid Typing Your Passphrase Repeatedly
A passphrase-protected key is more secure. But typing it every time you connect defeats the purpose of a smooth workflow. ssh-agent holds your decrypted key in memory for the session.
Start the agent and add your key:
eval "$(ssh-agent -s)"
ssh-add ~/.ssh/id_ed25519
You’ll type the passphrase once. For the rest of the session, SSH connections use the agent automatically.
On most modern Linux desktops, the agent is already running as part of the session. GNOME Keyring and KWallet both act as SSH agents. You can check if an agent is running:
echo $SSH_AUTH_SOCK
If it returns a path, an agent is active. List currently loaded keys with:
ssh-add -l
On a laptop, give the key a lifetime so it drops out of the agent automatically instead of sitting unlocked until you reboot:
ssh-add -t 4h ~/.ssh/id_ed25519
When something’s misbehaving and you want a clean slate, drop every key out of the agent and start over:
ssh-add -D
One thing to avoid: agent forwarding, the -A flag. It lets the remote host talk to your local agent, which sounds handy until you consider that root on that host can then authenticate as you to every server your key opens. If you’re reaching an internal machine through a bastion, use ProxyJump instead:
ssh -J bastion.example.com internal-host
Or set it once in ~/.ssh/config with ProxyJump bastion under the relevant host block.
Rotating and Revoking Keys
Keys don’t expire automatically. This is a responsibility you manage yourself.
To revoke a key, remove its line from ~/.ssh/authorized_keys on the server. Each line is one key. A quick way to view what’s in there:
cat ~/.ssh/authorized_keys
Each entry looks like:
ssh-ed25519 AAAA... your_label
Delete the line for the key you want to revoke. The label at the end (set with -C at generation time) makes it easy to identify which key belongs to whom. Use meaningful labels, especially on shared servers.
To generate a fresh key pair (rotation), simply run ssh-keygen again, add the new public key to authorized_keys, test it, then remove the old one.
Useful ssh-keygen Options Worth Knowing
A few extras that come up in real-world use:
Change the passphrase on an existing key (without regenerating):
ssh-keygen -p -f ~/.ssh/id_ed25519
View the fingerprint of a key (useful for verifying keys match):
ssh-keygen -lf ~/.ssh/id_ed25519.pub
Show the fingerprint in legacy MD5 format (some older tools and hosting control panels still display keys this way):
ssh-keygen -lf ~/.ssh/id_ed25519.pub -E md5
Check what keys a remote server is presenting:
ssh-keyscan -H your_server_ip >> ~/.ssh/known_hosts
Useful for pre-populating ~/.ssh/known_hosts in CI runners and provisioning scripts. Be clear about what it does and doesn’t do, though: ssh-keyscan records whatever key answers on that IP. It doesn’t verify anything. If you’re on an untrusted network, compare the output against a fingerprint you obtained out of band, from your provider’s console for example.
Host Key Verification and known_hosts
The first time you connect to a server, you’ll see something like:
The authenticity of host '192.168.1.100 (192.168.1.100)' can't be established.
ED25519 key fingerprint is SHA256:abc123...
Are you sure you want to continue connecting (yes/no/[fingerprint])?
This is SSH protecting you against man-in-the-middle attacks. The server’s public host key gets stored in ~/.ssh/known_hosts. Future connections are verified against it. If the fingerprint changes unexpectedly, SSH will warn you loudly. Pay attention to that warning. On a fresh server rebuild, you’ll need to remove the old entry:
ssh-keygen -R your_server_ip
If you keep hitting that error, Fix “Host key verification failed” walks through the remaining causes.
Pair This With Fail2ban
Even with password auth disabled, bots will still hammer your SSH port. They’ll just get rejected faster. fail2ban watches the auth logs and temporarily bans IPs that accumulate too many failed attempts. It’s a sensible complement to key-based auth, not a replacement for it.
Install on Debian/Ubuntu:
sudo apt install fail2ban
The default configuration protects SSH with no changes required. Moving SSH off port 22 is also worth considering, purely for log volume. It cuts the noise dramatically. It isn’t security, and any full port scan finds the new port in seconds, so treat it as housekeeping rather than hardening.
For jail configuration, ban times, and checking what fail2ban is actually banning, see Fail2ban on Linux: Protect Your Server from Brute-Force Attacks. Upstream documentation is at fail2ban.org.
Common Errors and Fixes
The failure modes you’ll actually hit, and where to look:
| Error | Likely cause | Fix |
|---|---|---|
Permission denied (publickey) |
Key not in authorized_keys, or wrong permissions/ownership on ~/.ssh |
Re-copy the key; chmod 700 ~/.ssh, chmod 600 authorized_keys, chown to the user |
Host key verification failed |
Server’s host key changed, often a rebuild, entry in known_hosts no longer matches |
ssh-keygen -R your_server_ip, then reconnect and verify the new fingerprint |
Too many authentication failures |
Agent is offering every loaded key and the server cuts you off first | Add IdentitiesOnly yes and the right IdentityFile to the host block in ~/.ssh/config |
Agent refused operation |
No agent running, or the key isn’t loaded | eval "$(ssh-agent -s)" then ssh-add ~/.ssh/id_ed25519; ssh-add -l to confirm |
Authentications that can continue: publickey (still asks for password) |
A drop-in file re-enables password or keyboard-interactive auth | Check /etc/ssh/sshd_config.d/; set PasswordAuthentication no and KbdInteractiveAuthentication no |
Quick Reference
- Generate key:
ssh-keygen -t ed25519 -C "label" - Copy to server:
ssh-copy-id -i ~/.ssh/id_ed25519.pub user@host - Test login:
ssh -i ~/.ssh/id_ed25519 user@host - Disable passwords: set
PasswordAuthentication noandKbdInteractiveAuthentication noin/etc/ssh/sshd_config - Check config:
sudo sshd -t - Reload SSH:
sudo systemctl reload ssh(orsshd, depending on distro) - Add to agent:
ssh-add ~/.ssh/id_ed25519 - Revoke key: remove its line from
~/.ssh/authorized_keys
Conclusion
Fifteen minutes per server, give or take, and then it mostly disappears from your day. The brute-force traffic doesn’t stop, it just stops mattering.
The step worth repeating, because it’s the one people skip: open a second terminal and confirm the key works before you disable password login. Almost every lockout story starts there.
For teams it scales without much ceremony. Everyone generates their own pair, you collect the public halves and append them to authorized_keys, and when someone leaves you delete their line. That last part only works if the keys are labeled, which is what the -C flag at generation time is for. Six months from now, three unlabelled ssh-ed25519 AAAA... entries on a shared server is a problem you’ll have to solve by process of elimination.