Linux: Guide to useradd, usermod, and groupadd
User and group management is one of those sysadmin fundamentals you touch constantly without always thinking about it. Creating a service account, locking down a shared server, adding a new team member, adjusting permissions for a deployment script. It all flows through the same set of commands.
This guide covers the core tools: useradd, usermod, userdel, groupadd, groupmod, and gpasswd. Real examples, with the options and best practices you should reach for most.
Where User and Group Data Lives
Before touching any commands, it helps to know what you are modifying. Linux stores user and group information in four files:
/etc/passwd– one line per user: username, UID, GID, home directory, shell/etc/shadow– hashed passwords and password aging policy/etc/group– group names, GIDs, and member lists/etc/gshadow– group passwords and administrators (rarely used directly)
You can inspect /etc/passwd directly with cat or grep, but use the dedicated commands to make changes. Editing these files by hand is asking for trouble.
A quick way to check an existing user:
grep ^username /etc/passwd
Or use id to see their UID, GID, and group memberships:
id username
useradd: Creating New Users
The basic syntax is straightforward:
sudo useradd username
But bare useradd with no options creates a minimal account. No home directory on some distros, no password, shell might default to /bin/sh. Not great for interactive users. Always specify what you need.
A lot of useradd behavior comes from two config files rather than the command line: /etc/default/useradd (default shell, home base path, skel location, expiry) and /etc/login.defs (UID/GID ranges, password aging defaults). If useradd behaves differently than you expect on a given box, those two files are the first place to look.
Common useradd Options
-m– create the home directory-d /path/to/home– specify a custom home directory path-s /bin/bash– set the login shell-G group1,group2– add to supplementary groups-c "Full Name"– set the GECOS comment field (usually the user’s real name)-u 1500– assign a specific UID-e 2025-12-31– set an account expiry date (YYYY-MM-DD)-r– create a system account (UID from the system range set in/etc/login.defs, commonly below 1000; no home directory by default, though whether-mcreates one for a system account can depend on distro config)
Creating a Standard Interactive User
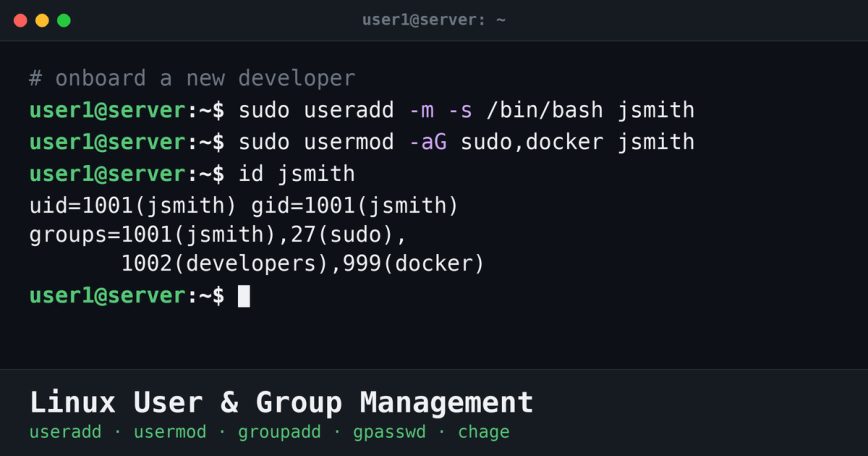
sudo useradd -m -s /bin/bash -c "Jane Smith" -G sudo,developers jsmith
Then set a password immediately:
sudo passwd jsmith
Without setting a password, the account exists but is locked. The user cannot log in.
Creating a System/Service Account
Service accounts run daemons and background processes. They should not have an interactive shell or a home directory in /home.
sudo useradd -r -s /usr/sbin/nologin -d /var/lib/myapp -c "MyApp Service" myapp
Using /usr/sbin/nologin as the shell means any login attempt returns a polite refusal and exits. That is exactly what you want for a service account. See Securing Linux with SELinux (or AppArmor) for more on locking down service accounts at the OS level.
Declarative Service Accounts with sysusers.d
On systemd-based distributions, packages often create their service users declaratively instead of calling useradd in a post-install script. You can do the same. Drop a file in /etc/sysusers.d/:
echo 'u myapp - "MyApp Service" /var/lib/myapp /usr/sbin/nologin' | sudo tee /etc/sysusers.d/myapp.conf
Then apply it:
sudo systemd-sysusers

The fields are type, name, UID (a dash lets systemd pick one from the system range), GECOS, home directory, and shell. This is idempotent: running it again will not fail if the user already exists, which makes it safe in package scripts and configuration management. The full format is documented in the sysusers.d specification. For one-off accounts useradd -r is still perfectly fine; reach for sysusers.d when you want the account defined as configuration rather than created by a command. This is systemd-specific: on non-systemd distros (Alpine with OpenRC, Devuan) there is no systemd-sysusers, so useradd -r stays the portable choice.
Distro Differences: useradd vs adduser
On Debian and Ubuntu, there is also adduser, which is a higher-level Perl script that wraps useradd. It is interactive and does more by default: creates the home directory, copies /etc/skel, prompts for a password and GECOS info.
sudo adduser jsmith
If you are scripting user creation, stick with useradd for portability. If you are on a Debian-based desktop and want something friendly, adduser works fine.
usermod: Modifying Existing Users
usermod lets you change almost any attribute of an existing account. The options mirror those of useradd, with a few extras.
Changing the Shell
sudo usermod -s /bin/zsh jsmith
Adding a User to a Group

This is one of the most common day-to-day tasks. To add a user to a supplementary group without removing them from their existing groups, use -aG:
sudo usermod -aG docker jsmith
The -a flag means append. Without it, -G alone will replace all supplementary group memberships with only the one you specify. That will lock someone out of groups they need. Always use -aG together.
Locking and Unlocking Accounts
Lock an account without deleting it:
sudo usermod -L jsmith
This prepends a ! to the hashed password in /etc/shadow, making it invalid. Useful when someone leaves temporarily or you need to suspend access fast.
Unlock it again:
sudo usermod -U jsmith
Changing Home Directory
sudo usermod -d /new/home/jsmith -m jsmith
The -m flag moves the existing home directory contents to the new location. Without -m, only the path in /etc/passwd changes but the old directory stays put.
Renaming a User
sudo usermod -l newusername oldusername
This changes the login name only. The home directory path, GID, and everything else stays the same unless you also update those separately. Processes already running under the old name keep running, and services that key off the numeric UID rather than the name will not notice the change, so a rename is safest when the user is not logged in. Usually you want to rename the home dir too:
sudo usermod -l newusername -d /home/newusername -m oldusername
Setting an Account Expiry
sudo usermod -e 2025-06-30 contractor1
After this date, the account is disabled automatically. Useful for temporary staff or contractors. Check the current expiry with:
sudo chage -l contractor1
userdel: Removing Users
Basic removal, keeping the home directory:
sudo userdel jsmith
Remove the user and their home directory:
sudo userdel -r jsmith
Before deleting, check if the user owns any files outside their home directory. Orphaned files can cause confusing permission issues later:
sudo find / -user jsmith 2>/dev/null
Transfer or delete those files before or after removing the account.
Group Management
Users belong to a primary group (set at creation) and can belong to multiple supplementary groups. Groups are how you control shared access to files and resources. sudo itself works via group membership on most distributions.
groupadd: Creating Groups
sudo groupadd developers
Create a group with a specific GID:
sudo groupadd -g 2500 developers
groupmod: Modifying Groups
Rename a group:
sudo groupmod -n devteam developers
Change its GID:
sudo groupmod -g 2600 devteam
Changing a GID does not rewrite ownership on existing files. Anything previously owned by the old GID now shows up as an orphaned numeric group until you fix it. Find and reassign those files:
sudo find / -gid 2500 -exec chgrp devteam {} +
groupdel: Removing Groups
sudo groupdel devteam
You cannot delete a group that is the primary group of any existing user. Remove or reassign those users first.
gpasswd: Managing Group Members
gpasswd is handy for adding and removing users from groups without needing usermod:
sudo gpasswd -a jsmith developers   # add jsmith to developers
sudo gpasswd -d jsmith developers   # remove jsmith from developers
You can also set a group administrator, someone who can manage group membership without full sudo:
sudo gpasswd -A jsmith developers
Checking Group Membership
See all groups for the current user:
groups
Check another user:
groups jsmith
Or use id for a more detailed view including numeric IDs:
id jsmith
Password Aging and Account Policies
chage controls password expiry and aging policy per user. It modifies /etc/shadow directly.
View the current policy for a user:
sudo chage -l jsmith
Force a password change on next login:
sudo chage -d 0 jsmith
Set maximum password age to 90 days with a 7-day warning:
sudo chage -M 90 -W 7 jsmith
Set an account expiry date:
sudo chage -E 2025-12-31 jsmith
On servers where multiple people have accounts, running sudo chage -l on a few accounts periodically is a good habit. Expired passwords that nobody notices can cause unexpected lockouts. You can also check recent login history with the last command to spot accounts that have not been used in a long time.
The /etc/skel Directory
When useradd -m creates a home directory, it copies the contents of /etc/skel into it. Whatever files you put there become part of every new user’s default environment: .bashrc, .bash_profile, .vimrc, whatever you want standardized across your team.
ls -la /etc/skel
On a shared server, this is a clean way to push a consistent shell configuration or set of aliases to every new account without touching individual home directories afterward.
Practical Example: Onboarding a New Team Member
Here is a complete sequence for adding a new developer to a server:
# Create the account with home dir, bash shell, and a comment
sudo useradd -m -s /bin/bash -c "Alex Doe" adoe

# Set a temporary password (user will be forced to change it)
sudo passwd adoe
sudo chage -d 0 adoe

# Add to required groups
sudo usermod -aG sudo,docker,developers adoe

# Verify
id adoe
sudo chage -l adoe
Practical Example: Removing a Departed User Safely
# Lock the account first while you sort out file ownership
sudo usermod -L adoe

# Find files they own outside their home dir
sudo find /var /srv /opt -user adoe 2>/dev/null

# Transfer ownership of important files to another user
sudo chown -R newowner:newowner /srv/project/adoe-stuff

# Then delete the account and home directory
sudo userdel -r adoe
Locking before deleting gives you time to handle any shared files or running processes without immediately breaking things.
Quick Reference
useradd -m -s /bin/bash -G group1 username– create interactive useruseradd -r -s /usr/sbin/nologin username– create service accountusermod -aG groupname username– add to group (append, do not replace)usermod -L username/usermod -U username– lock / unlockuserdel -r username– delete user and home directorygroupadd groupname– create groupgpasswd -a username groupname– add to groupchage -l username– view password and expiry policyid username– show UID, GID, groupsgroups username– show group memberships
Common Mistakes to Avoid
A few errors come up again and again, and all of them are easy to sidestep once you know they exist:
- Forgetting
-awith-G.usermod -G docker jsmithreplaces every supplementary group with justdocker. Always write-aGto append. - Running
userdelwithout checking file ownership. Files the user owned outside their home directory become orphaned and show up as a bare numeric UID. Run thefind -usercheck first. - Editing
/etc/passwdor/etc/groupby hand. A stray character or a mismatched field can lock people out or corrupt logins. Use the dedicated commands, orvipwandvigrif you must edit directly, since they lock the files and validate on save.
Conclusion

User and group management on Linux is not complicated, but the details matter. Forgetting -a with -G on usermod can silently strip someone of all their group access. Using bare useradd without -m and -s leaves accounts in an inconsistent state. Service accounts without nologin shells are an unnecessary risk.
Get the fundamentals right and the rest of access control, from SELinux and AppArmor to file permissions and sudo rules, becomes much easier to reason about. If you are setting up a new server and want a broader checklist of post-install tasks, the Linux Commands for Sysadmins series covers many of the surrounding tools worth knowing.