Home Lab Beginners Guide: Hardware (2026)

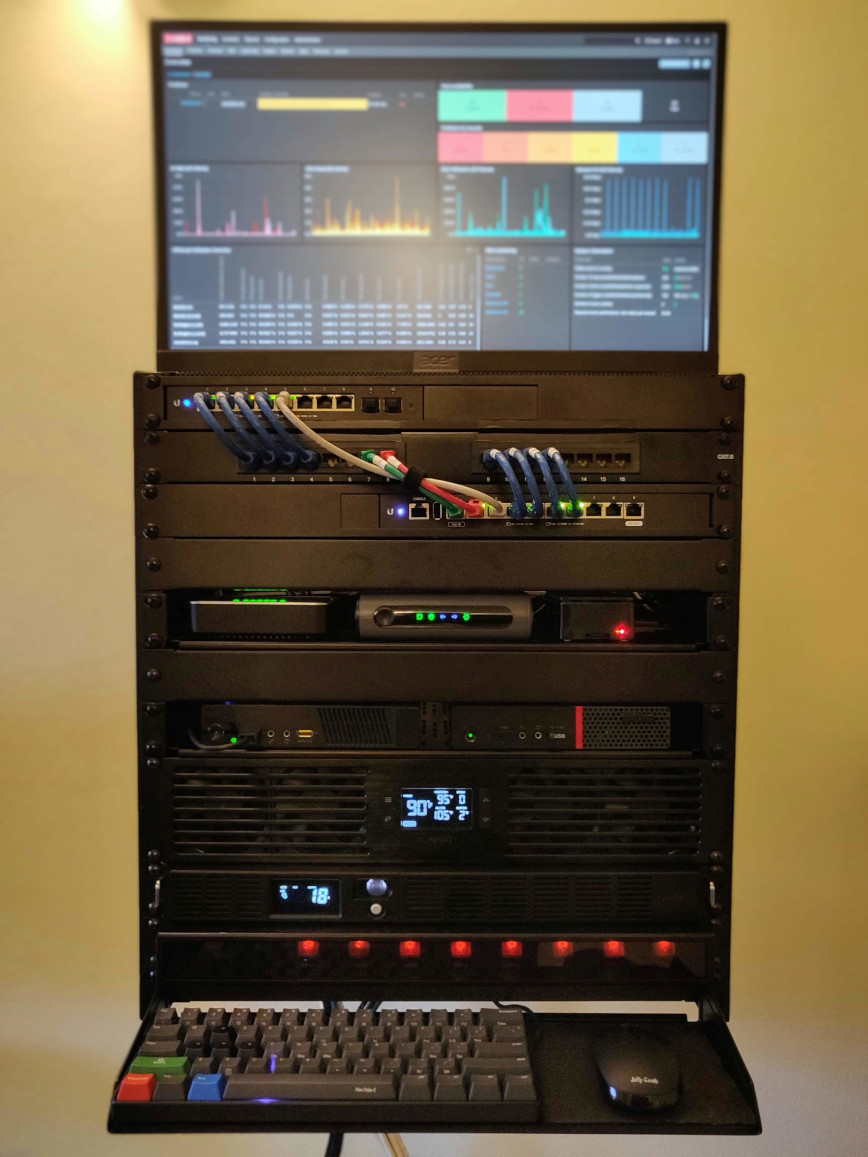
My home lab in a 12U rack as of March 2026.
What is a Home Lab?
Think of a home lab as a place where you can fail in the privacy of your own home. As Thomas A. Edison said: “I have not failed. I’ve just found 10,000 ways that won’t work.” I consider myself an expert at failure. But seriously, a home lab creates endless opportunities to experiment, learn, and yes, fail. Of course, all the while seeking success, but you got that already.
In general, a lab is a place where you can safely perform experiments. Most of you reading this article are techies and sysadmins. As you know, trying out new things on production equipment never ends well. Shush… it’s OK, I know, I know, you didn’t think that one command would take everything offline. This risk is the reason we build ourselves a sandbox environment to dabble, test, and fail in, all from the comfort of our own homes.
I run my home lab alongside test labs on servers in North America and Europe. My home lab handles remote backups, network monitoring and alerting of remote servers, wired UAP APs, and plenty of tinkering.
Note: This article was originally published in 2020 and is continuously updated as the homelab evolves. See the timeline at the bottom for photos and milestones from the past 6 years.
Last updated: March 8th, 2026
Home lab location, it’s all about location.
Location, Location, Location. It’s all about location! Please excuse the lack of originality – I’m a sysadmin, not a writer. I’ll try my best to get you to the end of this article.
Location is critical for several reasons. The choice between the home office, living room, closet, attic, basement, or garage depends on a range of important variables. These include room temperature and ventilation, workable space around your equipment, ease and distance of network cable runs, foot traffic, 24-hour ease of access, power, noise levels from your home lab, and more.
Here’s a quick list of Pros vs. Cons I’ve compiled to get us thinking about all the possible home lab locations. Choose wisely:
Home office
- Pros: Proximity to work area/desk/devices, fewer cable runs, and you can watch lights flash all day.
- Cons: no home office or you already spend too much time in your home office.
Living room
- Pros: Usually cool, lots of space/setup options, blinky-blinky sci-fi movie nights, and counts as family time.
- Cons: divorce, foot traffic, could get damaged, or damaged during the divorce.
Closet
- Pros: Easily accessible, stealthy, and you get to say: “Look at what I have hiding in my closet.”
- Cons: Poor ventilation (excess heat), lack of space, and one less closet = unhappy wife.
Basement
- Pros: Usually cooler temps, and volunteering to do laundry (maybe con?).
- Cons: don’t have a basement, flooding, spiders, or no access when injured.
Attic
- Pros: Less noise, easier cable runs.
- Cons: can get hot depending on where you live, roof leaks, humidity/condensation, and creepy at night.
Garage
- Pros: Less noise in the house, completely out of sight, wife won’t even notice.
- Cons: A Bug’s Life in your lab, excess heat (if no AC), dust, could require longer cables, or gets wrecked when parking the car.
For my lab, I built it out in my home office. I have laptops, a desktop, a server, and other devices in my office, so this location requires shorter cable runs. When selecting your location, consider the coolest area of the room/space, avoid direct sunlight and consider reserving space for future expansion.
It’s wise if you draw/sketch out a home network diagram or use network design software. Keep in mind your floor plan and how you will accomplish the cable runs. For example, most of the homes on this island have 8″ concrete interior walls. Think about these things before, not after. In other words, map everything out, make notes and create lists.
My Homelab Journey
Until recently, and for well over the past decade, my wife and I were nomads. Moving from the Caribbean to Miami, New York, Las Vegas, Vancouver, and now back home. This meant that for many of those years, my home office basically comprised of a few laptops and screens.
These days, we are more settled; my wife has completed her studies, works full-time, and my full-time job remains remote, via a home office supporting Linux servers and hosting them.
After a short trip to Antigua, I had a brief meeting with a tech friend of mine, Yves Ephraim. He was an Engineer with Cable & Wireless for 20 years (until 2003). Yves left C&W shortly before I started there in 2004. He’s a champion of the internet and technological developments in Antigua & Barbuda.
We sat in his home office, where he told me a bit about his current projects, as well as his dabbling with IPv6, web hosting, mail, BGP4, among other things. Most of which he does via his very capable home lab.
As I told Yves, our chat had me revisiting the idea. In fact, I think my exact words were, “Yves, I see your home lab, and I’ll raise you mine.” As always, I’m certain there’s a lot more to learn through discussion. In light of this fact, I wanted to share this journey with you, starting with the hardware selection process for my home lab. If you have ever been interested in building a home lab or if you already have one, then let’s mingle, share and dabble together.
Network vs. Server Racks vs. Cabinets?

Next, we need to decide how we will store the equipment (modems, routers, switches, servers, patch panels, UPS systems, power strips, cooling fans, etc.).
Network cabinets and racks are often confused with Server cabinets and racks. Routers, switches, patch panels, and the like are usually much shallower than servers. As such, Network Cabinets and Racks are usually not as deep as Server Cabinets and Racks. Also, networking devices often produce less heat than servers. You will find some network cabinets will have glass doors that may not leave enough ventilation for servers.
After deciding the depth and ventilation requirements for your home lab, there are a couple of other things to consider. A cabinet is an enclosed space with door(s) and/or removable sides, whereas a rack is a semi or fully open (4 sides open) frame. To help you decide whether to use a cabinet or rack, consider the following:
- If you are installing large, heavy servers, then the extra stability of cabinets or four-sided racks should be considered.
- If you need frequent access to the sides or rear of equipment, then an open rack or cabinet with removable sides would work well.
- If your equipment requires extra cooling, an enclosed cabinet will need more attention to cooling and ventilation.
- If the room is prone to dust, the extra protection of a cabinet will go a long way in keeping it out of your equipment.
- If you are installing in a general living area frequented by house guests, consider an enclosed cabinet that can often look neater in appearance when locked. However, a well-maintained open rack with tidy power and network cable runs can look just as neat!
- If restricted access/security is required, many enclosed cabinets often offer lock and key access control for better security.
Recommended Home Lab Hardware
Now that you have already measured your equipment’s maximum depth and considered all the above advice, it’s time to buy your first piece of hardware. Or not. You could have probably skipped to this section if you prefer more em’, creative methods for hosting your home lab. However, most of the above advice applies even if you plan to set up your home lab in your existing living room cabinet, on a bookshelf, under your desk, or in a cardboard box. No, seriously…
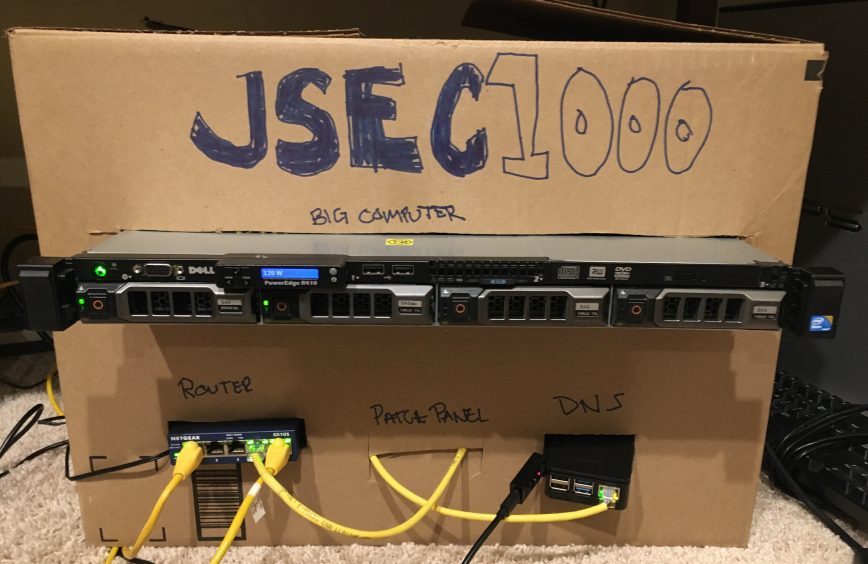
Image: Fancy cardboard box cabinet.
NOTE: You can get most of the equipment listed below via Craigslist, Universities, and other local second-hand options in some countries. Prices on this page reflect Amazon’s current pricing, which is subject to change. As an Amazon Associate member, I’ve included paid links to items, for which I’m compensated. For all other items not listed on Amazon, if the links become broken over time, please let me know, as it always seems to happen often, which is another benefit of using Amazon’s links.
To replace or not to replace: ISP Cable Modem

Before we delve a bit deeper into my home lab recommendations, if you are a beginner to switching and routing, then a lot of the hardware below may seem to be a bit of an overkill. You can get your feet wet by merely replacing your ISP’s cable modem (ISP or Internet Service Provider), you know, that thing with all the flashing lights that you frequently have to unplug to reset to regain internet access. Yup, that one, the mini heater in your living room.
Most US ISPs charge monthly rental for that thing. Buying your own could make some financial sense. As well as giving better performance, reliability, and security. Bet you were already sold with the financial bit eh? But it gets better; most of these modems provided by ISPs are usually of poor quality, used, and lack features. Lastly, your ISP’s Modem/Router combos often cannot independently update firmware versions as new exploits emerge. This means you are at the mercy of your ISP to push new patched firmware.
If you have a great ISP and this does not apply to you, stick with your modem. The only reason to replace it in such circumstances will be to have access to additional network features and create a home lab where you can test away!
For cable internet, models like the Motorola MB7621 32×8 or the newer Motorola MB8611 (DOCSIS 3.1) are solid choices. If your ISP offers fiber, you may be able to replace the ONT (Optical Network Terminal) with your own, though this varies by provider. In many fiber setups, the ONT is provider-managed and you connect your own router directly to it, which is actually ideal for a home lab since you have full control from the router onward.
If you would like to keep things simple, then go with a Modem + Wi-Fi router combo. Otherwise, continue if you would like to build out a home lab to manage Firewall, NAS storage, VPN, VLANs, PoE (Power over Ethernet), Virtualization, remote network infrastructure monitoring/alerting, wired APs, web servers, backup servers, the list goes on.
One thing to keep in mind: cable modems give off quite a bit of heat. When deciding on rack placement, position them toward the top or leave space above and below for airflow.
Selecting Your Home Lab Rack
A rack unit (abbreviated U or RU) is a unit of measure defined as 1 3⁄4 inches (or 44.45 mm). It’s the unit of measurement for the height of 19-inch and 23-inch rack frames and the equipment’s height. The height of the frame/equipment is expressed as multiples of rack units. A typical full-size rack is 42U high. Racks and cabinets are then listed as 1U, 2U, 3U, 4U, and so on.
Here’s an example below of a 6U rack (labeled):

- StarTech 12U Wall Mount Rack – 13.5″ Deep / 19″ wide / 125lbs Capacity – $158 (specs) – During my search for a wall-mounted rack, I almost purchased the 6U version of this rack, then at the last minute, I switched to the 12U version for possible future expansion. This is the rack I’ve been using since 2020 and it’s been rock solid.
- Samson SRK-12 Universal Equipment Rack Stand – $230 (specs) – This is an audio equipment rack that is fully compatible with shallow-mount equipment. One advantage is that it’s supported on wheels, so you don’t have to fix it to a wall or floor. If your room is air-conditioned 24/7 and you don’t mind a low-to-floor setup, this may be the rack for you. Here’s a great example of how clean this Rack can look when set up.
- NavePoint 9U Basic IT Wall Mount Network Rack Locking Glass Door – $235 (specs) – This is a very beautiful-looking Network Cabinet. The issue for me is that I only use the AC in my office in the summer, and I don’t want the heat ever to be an issue; thus, for my home setup, an enclosed cabinet wasn’t right for me.
Tip: When measuring for rack-mount equipment, compare the width of each device against the width of the rack shelf, not the rack’s interior width. I learned this the hard way when my Ubiquiti EdgeRouter and EdgeSwitch turned out to be about an inch too wide for the shelf. I ended up needing separate rack mount kits to fix the issue.
Home Lab UPS (Uninterruptible Power Supply)

At home, we have a backup generator that runs on propane. It can run for up to a week, which is useful in the tropics. It takes a minute or so to failover to the backup generator, so the rack mount UPS solution I needed was something to support between 100W and 200W for a couple of minutes. Long enough to fail over to the backup gen or to shut down all the equipment cleanly.
- CyberPower OR500LCDRM1U UPS, 500VA/300W, 6 Outlets, AVR, 1U Rackmount – $220 (specs) – A small 1U rackmount UPS coming in at 20lbs. Battery performance has been above expectations: running it down to around 50% gives just over 30 minutes of runtime, including powering 2 PoE APs and a 27″ monitor.
Ultimately, you will have to decide whether you even require an uninterruptible power supply at home. From experience, UPS batteries are almost always a disappointment, and this is largely because of the cost vs. return. If you really need to have a UPS, you could spend thousands just to have a long enough runtime. My advice: get a UPS that provides just enough runtime for everything to shut down cleanly and only use the UPS for the most essential and efficient devices in your home lab. Pay attention to your power consumption when choosing equipment. Low-power devices pay off here: my PoE APs, for example, max out at just ~9W each, keeping the UPS load at 20-30% capacity.
Universal Home Lab Rack Shelf

Did you notice that the CyberPower 1U UPS does not have rack mounts? Of course, you could rest it on top of other equipment; however, I wouldn’t recommend that because we should keep the batteries as cool as possible and leave space between equipment to reduce the amount of trapped heat. Lastly, for this setup, it will look more professional if placed on a ventilated 1U rack shelf:
- AC Infinity Vented Cantilever 1U Universal Rack Shelf, 10″ Deep, for 19″ – $30 (specs) – These shelves are available from 6″ to 16″ deep. The backup battery is 9.5″. Pay attention to the depth of your rack/cabinet and equipment before deciding what you need. Very sturdy, great for keeping equipment cool and cable management thanks to the vents and slots.
Rack Mount Home Lab Power supply

The aforementioned CyberPower UPS comes with six outlets – four backup /w surge + two surges only. Currently, under my desk, I’m using seven outlets, and this is before ordering a replacement ISP modem, router, switch, servers and does not consider any future expansion. Right above the UPS, I will be mounting the following:
- ADJ Products AC POWER STRIP (PC-100A) – $30 (specs / alternative) – Plugs directly into the 1U CyberPower UPS and allows easy on/off switching of equipment and devices. Very convenient.
Don’t forget outlet savers to make use of all available power outlets, and 1U blanking panels to improve airflow efficiency in your rack.
Rack Mount Home Lab Cooling Fans

Maintaining an optimal temperature for rack-mounted equipment prevents overheating, ensures consistent performance, and extends their lifespan.
I used the AC Infinity CLOUDPLATE T7-N 2U Intake ($130) for about 4 years. At the lowest fan speed, it cooled the rack nicely. However, the fans started failing after about 2 years due to dust buildup, and by year 3, three of four fans had failed. The internal connectors are hot-glued to the circuit board with 3-pin wafer connectors, making fan replacement difficult. I removed the unit entirely in April 2025 and switched to passive cooling with 1U vented panels, which has been working fine.
My recommendation: if your homelab is in an air-conditioned, low-dust environment, active cooling fans may not be necessary. If you do need active cooling, the AC Infinity units work well but expect a lifespan of 2-3 years unless you clean them with compressed air every couple of months. Take a look at the current best options and read the reviews before deciding.
Home Lab Routers and Switches

After many weeks of research, online comparisons, reading reviews, watching YouTube videos, and countless hours spent on /r/homelab, I can safely say that the following three companies’ devices will fully cover all of your routing and switching needs: Cisco > Ubiquiti > TP-Link.
For my setup, I’m going more small-business than a home office as far as equipment goes. I want to be able to have future access to additional features. The following were my selections, followed by the runner-ups.
Routers
- Multi-WAN Load Balancing: Peplink B-One Gigabit Dual WAN WiFi Router – $300 (specs) – for Wireless Internet | 1GBps Throughput | 2X WAN Port, 4X LAN Port, Dual-Band 2X2 MIMO Wi-Fi | WAN Smoothing for Small Office & Home Connectivity
- Small Biz features: Ubiquiti Dream Machine UDM Pro – $380 (specs) – 10G + Multigig + PoE. All-in-one router and security gateway.
- Home Lab Value: TP-Link ER8411 | 10G VPN Router – $400 – Up to 10 WAN Ports | SPI Firewall | Support Omada SDN | Load Balance | Lightning Protection.
- There are also many great 1U firewall hardware options and 1U network router options available. Take a look at the tiny beast that is the MikroTik RB4011.
Switches
- Enterprise features: Ubiquiti USW-Pro-Max-16-PoE (180W) – $400 (specs) – A 16-port, Layer 3 Etherlighting switch with 2.5 GbE, PoE++ output, and versatile mounting options.
- Home lab beast: TP-Link SG2210XMP-M2 – $350 (specs) – Omada 8-Port 2.5GBASE-T and 2-Port 10GE SFP+ Smart Switch with 8-Port PoE+.
There’s also Netgear, pfSense, OPNsense, IPFire, and many, many other options, but you want me to complete this article, don’t you? Of course, this means that you will still have to research the recommendations on your own, as not all of my picks may fit your requirements.
For a deeper dive into switches specifically, see my other articles: How I Chose the Best Managed Network Switch for My Home Lab, 20 Best Network Switches Under $100, and Choosing a Network Switch: 6 Essential Tips. Also see my current router/firewall and switch hardware.
Home Lab Patch Panels and Network Cables
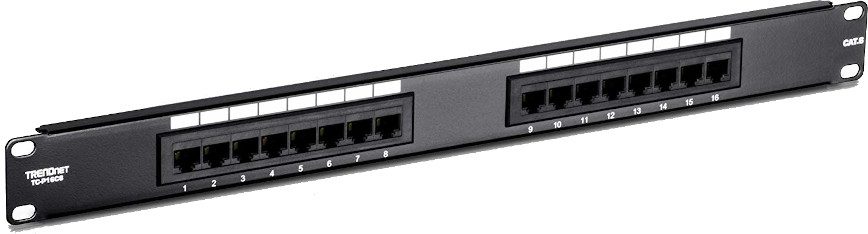
In hindsight, I should have gone with the 24 port patch panel. Instead, I went with this 16 port patch panel because, well, I liked how centered and less busy it looked. I know. I don’t want to hear it. But look at that thing! If it isn’t already obvious by the 16 ports, it’s the image just above. Six years later, the 16 ports is still just enough!
The fastest internet plan available from my ISP is 160Mbps down / 30Mbps up. For my home lab, I won’t be needing CAT8 or CAT7 anytime soon, and I don’t need high LAN traffic. So I purchased 250′ of regular CAT6 reel and some different lengths Cat6 as I’m ok with the 1000Mbps limit. Yeah, I also like my coffee black. If you want smoother network traffic, then, by all means, go for at least CAT6a. However, make sure you go with a shielded patch panel. Going CAT7 cable or Cat6a is a waste of money if your RJ45 connectors and patch panels don’t support it. “Keep it simple stupid!” No, I’m not talking to you; that was me speaking to myself while selecting the patch panel and cables.
High quality patch panel, easy to punch down. All my patch connections worked on the first try. Don’t forget to budget for a longer coaxial cable than you think you’ll need. Mine came up about three feet short during the initial setup.
Home Lab Servers

For this article’s purpose, I won’t recommend any specific servers because this will vary a ton depending on what you will be hosting. NAS storage, VMs, web servers, backup servers, mail servers, ad blockers, and all the rest. For my requirements, I purchased a ThinkCentre M73 and ThinkCentre M715q; both used off eBay. AMD has raised the bar: I’m most impressed with the CPU performance of the M715q. They both run quiet and cool, with Ubuntu Server and Windows 10.
As far as full-fledged servers go, some good options are Dell, HP, Cisco, and Lenovo. For home labs, these are often best purchased used from Craigslist or eBay. You can use Wikipedia to search the specs of older generations, for example, Dell PowerEdge model history.
Whole-Home VPN: A Simple Build for a Friend
A friend asked me to set up a simple whole-home VPN for their household. The entire build uses less than 40 watts via a 700VA UPS, proving that a home lab doesn’t have to be complex or power-hungry to be useful:
- StarTech.com 6U Wall Mount Network Equipment Rack – 14 Inch Deep
- AC Infinity Vented Cantilever 1U Universal Rack Shelf, 10″ Deep
- C2G 12-Port Patch Panel
- VCE UL Listed CAT6 RJ45 Keystone Jack Inline Couplers
- Vilros – Raspberry Pi 4 2GB Basic Kit – running Unifi Controller
- Brume (GL-MV1000) – Edge Gateway + VPN (wireguard)
- Edgeswitch 10xp
- StarTech.com 8 Outlet Horizontal 1U Rack Mount PDU Power Strip
- CyberPower SL700U Standby UPS System, 700VA/370W, 8 Outlets, 2 USBs

Summary and Conclusion
I started this home lab in 2020 with a 12U wall-mount rack, a cable modem, and an EdgeRouter. Six years later, I’ve upgraded to 10G uplinks, a pfSense firewall, 2.5G LAN, and replaced Zabbix with Checkmk RAW for monitoring. The lab has survived multiple moves, countless hardware swaps, and more than a few lessons learned the hard way.
The most important thing I’ve learned is this: start small and plan for growth. You don’t need a rack, cabinet, patch panels, and all the other gear on day one. Replace your ISP modem, add a proper router, and build from there. Keep power consumption in mind from the start. You don’t want to end up with a power bill that rivals your mortgage.
If you’re looking to go deeper, here are some related articles from the site:
- My $300 pfSense Firewall Appliance – Part 1: Unboxing
- pfSense Firewall Config: My Settings with Screenshots – Part 2
- How I Chose the Best Managed Network Switch for My Home Lab
- 5 Network Devices for work-from-home and Small Business
- Self-hosted Projects That Earn (Make money from your Home lab)
- Finding Linux Compatible Printers
- Home Lab inspiration – A letter from a reader
Feel free to join the discussion in our community forums. I love hearing, supporting, and learning from you guys!
Homelab Timeline: 6 Years of Evolution
Here’s how the home lab has evolved since 2020. What started as a basic rack build has gone through multiple upgrades, a house move, and a complete networking overhaul.
March 2020: First build complete

April 2020: Added 4G failover, VLANs, blanking panels, Zabbix monitoring


May 2020: Added Raspberry Pi + Zabbix dashboard monitor

June 2020: Added keyboard, swapped mesh cover for tinted plexiglass
2022-2023: Moved to a new home, replaced EdgeRouter with Peplink Balance 20x, upgraded UPS

2025 to present: Upgraded to 10G uplinks + 2.5G LAN with pfSense firewall, replaced Zabbix with Checkmk RAW, switched to passive cooling
Related articles:
- My Quest for the Ultimate Home Office Firewall
- Choosing the Perfect Network Firewall Device for under $300
- My $300 pfSense Firewall Appliance – Part 1: Unboxing
- pfSense Firewall Config: My Settings with Screenshots – Part 2
- How I Chose the Best Managed Network Switch for My Home Lab
First Published: Feb 25th, 2020 | Last updated: March 8th, 2026

Where did you buy the plexiglass cover for the power strip switches? Or did it come with the power strip. Thanks.
Hey Ross, you can find it here.
…I got mine off eBay used but I don’t see any listed currently.
This is pretty impressive and neat!
How much would this typically cost to do it on the cheap end of things? I think most items can be sourced on Amazon or eBay these days. Could be a fun summer project for myself.
Thanks! It really depends. As per the article: see the subheading “To replace or not to replace: ISP Cable Modem”. It can be anywhere from $50 or $5000 it all depends on where you want to start and finish.
Very nice setup. I set a basic one up during the refurb of the house so it’s ok but didn’t get time to really think it through. Thanks for the ideas here.
But that keyboard. Love it. Giving me serious Wargames vibes. What’s the brand, please?