Raspberry Pi Not Booting: How to Repair Micro SD Card
I have a Raspberry Pi 4 (2 GB RAM) that’s been running my UniFi Network Controller for about four years without issues. Yesterday it was unresponsive and would not boot at all. The status LED stayed solid (no usual blinking), and I couldn’t SSH into the Pi or see it on the network. If your Raspberry Pi suddenly won’t boot, a corrupted microSD card is a common culprit; here’s how I fixed mine.
Unexpected power loss or simply an aging card can damage the file system. In this guide, we’ll show how to rescue and repair a Raspberry Pi’s microSD card. We’ll back up the card, fix errors, and get your Pi running again.
Back Up the SD Card Before Repair
Remove the SD card and attach it to a computer. This is a Linux blog, and I will be focusing on using Linux since it’s ideal for the Raspberry Pi’s ext4 file system. Before attempting any fixes, create a full image backup of the card.
On a Linux PC
You can use the dd or the more robust ddrescue utility. Unlike dd, ddrescue will skip over unreadable sectors instead of stopping, which is very useful if the card has bad blocks:
Install ddrescue (called gddrescue on some systems)
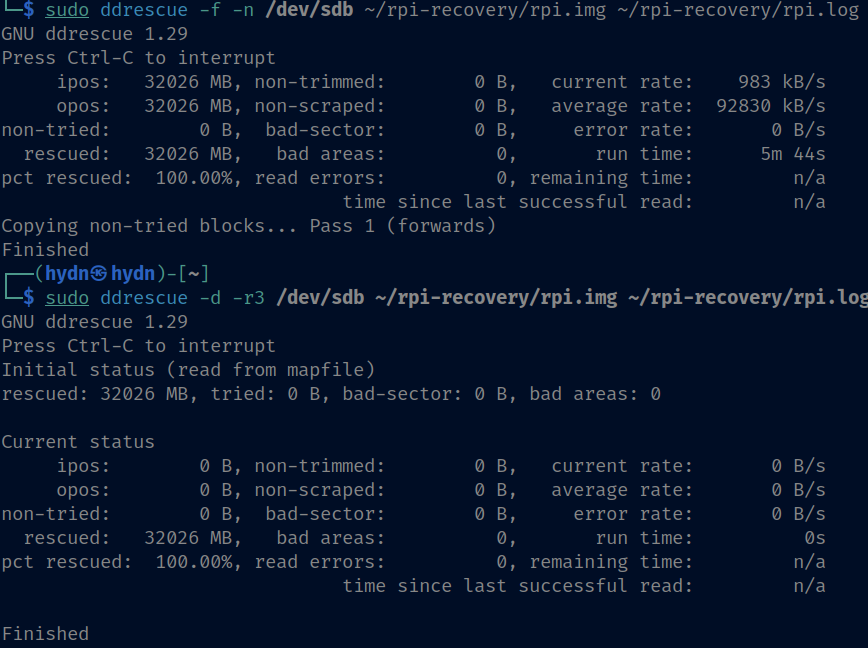
sudo apt update && sudo apt install -y gddrescue
mkdir -p ~/rpi-recovery
sudo ddrescue -f -n /dev/sdX ~/rpi-recovery/rpi.img ~/rpi-recovery/rpi.log
sudo ddrescue -d -r3 /dev/sdX ~/rpi-recovery/rpi.img ~/rpi-recovery/rpi.log
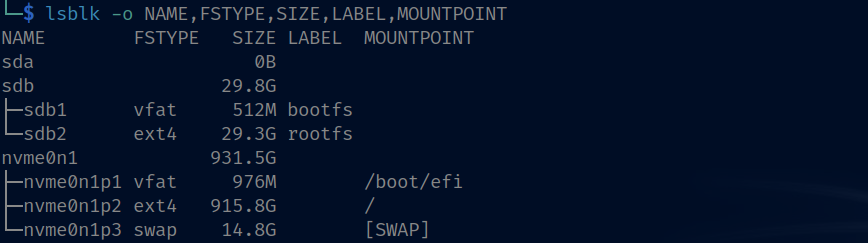
This creates rpi.img. The first pass (-n) copies all good areas. Then second pass with retries 3 times (-d -r3) to attempt reading bad areas. Replace /dev/sdX with your SD card device (e.g. /dev/sdb). You can find this by running:
lsblk -o NAME,FSTYPE,SIZE,LABEL,MOUNTPOINT
Windows or Mac
Use imaging software (like Win32 Disk Imager on Windows or ApplePi-Baker on Mac) to read the SD card to an image file. If the card isn’t recognized at all or has physical errors, the backup may not succeed.
Having a backup is important because if anything goes wrong now, or the card is dying, you can restore data from the image.
Repair the SD Card’s File System
Once you have a backup, proceed to fix the card’s file system errors. There are typically two partitions on a Raspberry Pi OS card: a small FAT32 boot partition and a larger ext4 root filesystem partition. We will check and repair both:
Once ddrescue has created rpi.img and the log file, you can repair the filesystems either on the image or on the physical card. Repairing the image is safest because it leaves the original untouched.
Repair the cloned image
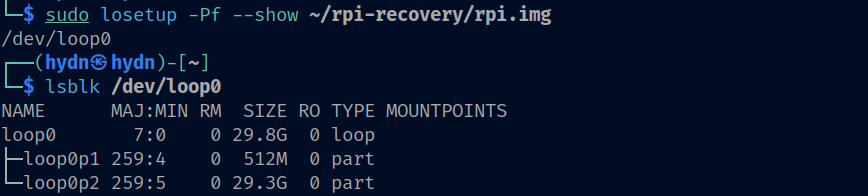
Create loop devices for the image and run fsck on each partition:
sudo losetup -Pf --show ~/rpi-recovery/rpi.img
Shows /dev/loop0. Then:
sudo fsck.vfat -av /dev/loop0p1 # boot (FAT) partition
sudo e2fsck -fvy /dev/loop0p2 # root (ext4) partition
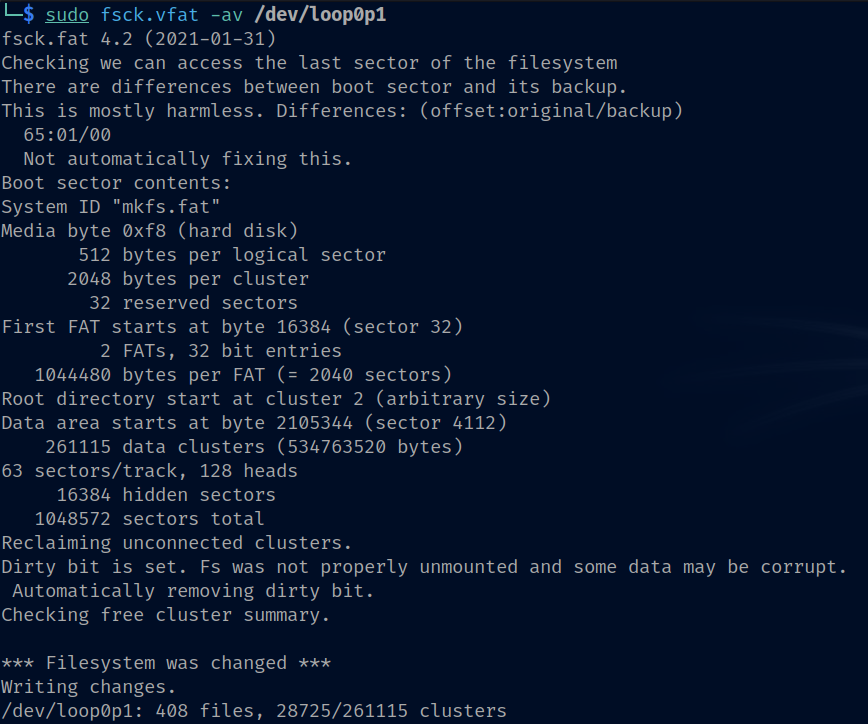
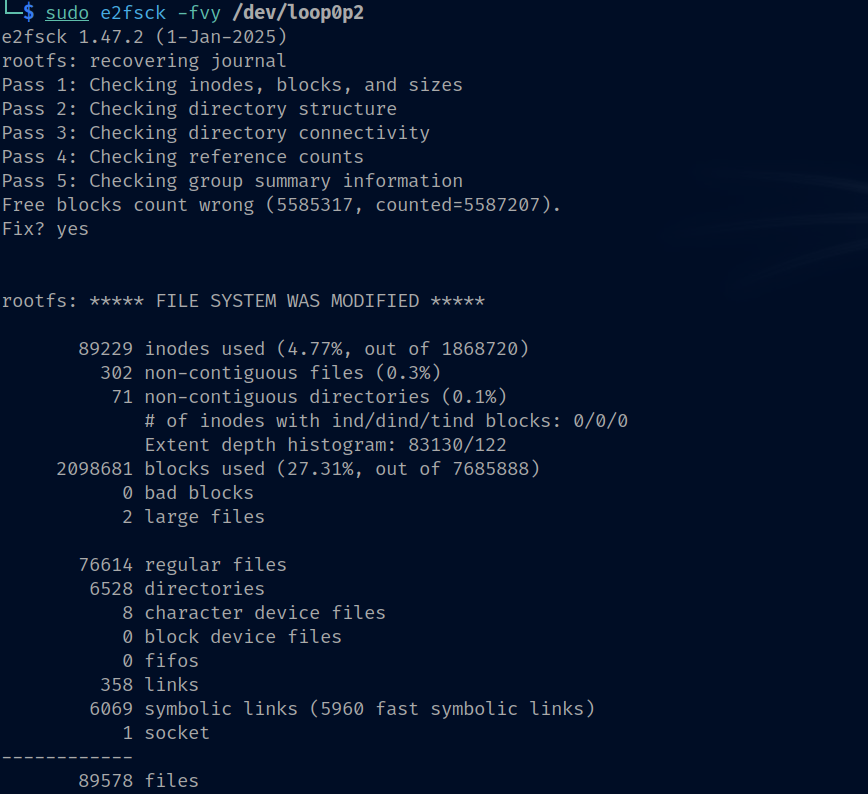
This fixes the FAT32 boot volume and the ext4 root filesystem on the rescue image. Then, copy the repaired image back to the same SD card or a new card.
Copy the repaired image to an SD card

As per the screenshots, the commands heve been tested; be careful!
If you haven’t already, mount the repaired image partitions:
sudo mkdir -p /mnt/boot /mnt/root
sudo mount /dev/loop0p1 /mnt/boot
sudo mount /dev/loop0p2 /mnt/root
Now prepare the target card (replace /dev/sdX with your SD card, e.g. /dev/sdc). This will erase the partitions:
sudo umount /media/$USER/* 2>/dev/null || true
sudo umount /dev/sdX1 2>/dev/null; sudo umount /dev/sdX2 2>/dev/null
sudo mkfs.vfat -F 32 -n bootfs /dev/sdX1
sudo mkfs.ext4 -L rootfs /dev/sdX2
Mount the new card:
sudo mkdir -p /mnt/new_boot /mnt/new_root
sudo mount /dev/sdX1 /mnt/new_boot
sudo mount /dev/sdX2 /mnt/new_root
Now, copy everything from the repaired image:
sudo rsync -aHAX --info=progress2 /mnt/boot/ /mnt/new_boot/
sudo rsync -aHAX --info=progress2 /mnt/root/ /mnt/new_root/
Point the new card to its own PARTUUIDs:
BOOT_UUID=$(blkid -s PARTUUID -o value /dev/sdX1)
ROOT_UUID=$(blkid -s PARTUUID -o value /dev/sdX2)
sudo sed -i "s#root=PARTUUID=[^ ]*#root=PARTUUID=${ROOT_UUID}#" /mnt/new_boot/cmdline.txt
printf "PARTUUID=%s / ext4 defaults,noatime 0 1\nPARTUUID=%s /boot/firmware vfat defaults 0 2\n" "$ROOT_UUID" "$BOOT_UUID" | sudo tee /mnt/new_root/etc/fstab >/dev/null
Finishing up:
sudo touch /mnt/new_root/forcefsck
sync
sudo umount /mnt/new_boot /mnt/new_root
Prefer a raw clone instead of rsync? Read the dd command section of Linux Commands frequently used by Linux Sysadmins – Part 4.
Repair the SD card directly.
This means you don’t have to copy the image to the SD card because you are attempting to fix it in place. You should complete the Back Up the SD Card Before Repair section before attempting this.
Unmount the SD card partitions
If your computer auto-mounted the SD card, safely unmount it before running repair tools. For example, on Linux:
sudo umount /dev/sdX1
sudo umount /dev/sdX2
(Assuming /dev/sdX1 is the boot partition and /dev/sdX2 is the root partition.)
If the card isn’t locked in a read‑only state and you’re comfortable working on the device itself, run the same checks on its partitions:
sudo fsck.vfat -av /dev/sdX1
sudo e2fsck -fvy /dev/sdX2
Replace sdX with the device name you found earlier (e.g. sdb).
Be patient, as it can take a while for large cards. The tool will attempt to repair inconsistencies in the ext4 journal and data structures. If prompted to fix things like free block counts or directory entries, fsck will do so and report that the “FILE SYSTEM WAS MODIFIED”.
After fsck reports that the filesystems are clean, you can put the card back into the Pi and attempt to boot. Or, copy the repaired image to a new microSD if you prefer to retire the old card.
On Windows, you can run chkdsk on the SD card’s boot drive letter (since Windows can handle FAT32 natively).
If you get errors about a corrupt superblock or the partition not being readable, the card may be severely corrupted. You might try using an alternate superblock (ext4 stores multiple copies), but this is advanced. In many cases, if fsck cannot repair the volume, you may need to recover important files from the backup image and consider reformatting or replacing the card.
Preventing Future SD Card Failures
Once your Raspberry Pi is up and running again, consider a few measures to reduce the chance of SD card corruption and also reduce SD card wear in the future:
Always shut down properly: Abrupt power cuts or unplugging the Pi without shutdown can corrupt the card. Always execute sudo shutdown -h now or use the desktop shutdown and wait for the green LED to stop blinking before removing power. Use a UPS-backed setup when using Raspberry Pi for critical projects.
Use a quality power supply: Insufficient voltage can cause the Pi to reset or disks to corrupt. Ensure your power supply provides a stable 5V at enough current.
Also read: What to buy for your Raspberry Pi 4 and What to buy for your Raspberry Pi 5.
Enable ZRAM (or Zswap) for swap (compressed RAM disk): Frequent writes to swap space can wear out an SD card. Raspberry Pi OS uses a swap file by default, which resides on the SD card. You can reduce writes by using zram, which creates a compressed swap in RAM.
sudo apt update && sudo apt install -y zram-tools
For example, installing a tool like zram-tools or zram-config will set up a zram swap device. After I enabled Zram on this Pi, the system will now allow up to 256 MB of Zram swap in RAM and not touch the 4 GB swap file on SD until Zram is exhausted:

/dev/zram0 (compressed memory swap) will be used before /var/swap (disk), due to higher priority.
If you hardly use swap, set swappiness to 10, if the system swaps heavily, set swappiness to 60 or 100.
Periodic file system checks: Raspberry Pi OS will automatically run fsck on boot if it detects issues, and by default it forces a check after a certain number of mounts or time (typically every 30 boots or 3 months). You can tune this schedule with tune2fs to force checks more frequently. Regular fsck checks can catch and fix errors before they accumulate.
For example, if your RPi is being used as a server that is hardly ever rebooted, you can force a check during every boot using this command:
sudo tune2fs -c 1 /dev/mmcblk0p2
Note: /dev/mmcblk0p2 is the root partition on my Pi. On your system the device name might be different.
Run lsblk -o NAME,FSTYPE,SIZE,LABEL,MOUNTPOINT to identify the correct root partition for your setup before running tune2fs.
Also follow this guide: Increase the Performance and Lifespan of SSDs & SD Cards.
Conclusion
By following these steps, you should be able to recover a non-booting Raspberry Pi caused by SD card corruption and also prolong the life of your new or repaired microSD card. Regular backups are always a wise idea as well. Even with preventive measures, SD cards can fail without much warning. With a good backup and the techniques above, you can minimize downtime and get your Raspberry Pi back up and running quickly!
