10 pfSense Setup Changes to Make Post Install
Just installed pfSense? Before diving into VLANs, firewall rules, or VPN tunnels, take a few minutes to lock in these essential setup changes. These quick tweaks will boost security, improve reliability, and prevent many future headaches. This is my post-install checklist for pfSense deployment.
1 — Bump the local backup count well past the default

Right after install go to Diagnostics → Backup & Restore → Config History and change Backup Count from the default 30 to something much larger, like 300, 500, even 1 000! During the first days you’ll add interfaces, aliases, firewall rules, packages, tweak settings, delete and redo things, dozens of saves per hour.
With only 30 backups kept, those rapid-fire edits can push earlier restore points off the list in just minutes. A setting of 1000 kept me from losing work twice. Sometimes it can take days or more before you realize your config changes created issues. As such, more history means that you can roll back to a previous working backup instead of guessing which tweak(s) introduced problems. Thank me later!
2 — Turn on encrypted Auto Config Backup for cloud backups

Follow that up in Services → Auto Configuration Backup (ACB): tick Enable automatic configuration backups, set a long Encryption Password, and keep the generated Device Key somewhere safe. Every saved change is now shipped, encrypted, to Netgate’s cloud. If the firewall’s storage dies or some other issue preventing local restore, you can reinstall, enter the key, and your exact config comes back!
Together, an expanded local history and an off-site ACB for disaster recovery gives you added protection and peace of mind.
3 — Switch the DHCP backend to Kea early on

Note: On pfSense 2.8+, Kea is the new default on fresh installs.
In System → Advanced → Networking, make sure Kea DHCP is selected (screenshot above). It’s the new default and will eventually replace ISC entirely—so it’s better to make the switch now while your setup is still fresh. Kea handles things differently under the hood, so making the change early avoids conversion headaches down the road.
4 — Turn on hardware crypto and choose the right thermal sensor

In System → Advanced → Miscellaneous set Cryptographic Hardware to AES-NI CPU-based Acceleration. Modern Intel and AMD CPUs include AES instructions that pfSense can tap for IPsec, OpenVPN, WireGuard and even GUI HTTPS—handing off the heavy math, cutting VPN latency and freeing the cores for everything else. Check if your CPU supports this first.
Just below that, pick the thermal-sensor driver that matches your processor (for example Intel Core on-die, AMD Zen, etc.). With the correct module loaded, the dashboard will now show real chip temperatures.
5 — Move /tmp and /var into RAM for speed on beefy boxes

If your pfSense box has 4 GB of RAM or more, tick Use RAM Disks on the System → Advanced → Miscellaneous page and size the /tmp and /var directories to match your usage (128 MiB is a safe starting point). PfBlockerNG and Suricata spin up large temporary files when pulling or reloading feeds. Keeping those in RAM rather than on a slower SSD or disk slashes I/O latency and makes rule-reloads and other pfSense related processing faster.
6 — Install Service Watchdog to auto-restart key daemons

System → Package Manager → Available Packages → Service_Watchdog
Suricata, pfBlockerNG, Wireguard, and OpenVPN are all great, until one of them crashes at 3 a.m. Unbound stopped on my pfSense yesterday after I restarted Suricata and pfBlockerNG. The Watchdog package polls selected services every minute and restarts any that aren’t running. A tiny safety net that costs almost no resources but saves a midnight drive home (or office) to the rack.
7 — Harden the WebGUI even more
Note: By default, pfSense isn’t reachable outside of your LAN. However, it’s still a good practice to make this change, in the event that pfSense gets unknowingly exposed someday.

Straight after the installation, head to System → Advanced → Admin Access. Switch the webConfigurator to HTTPS and, in the TCP port box, use a non-standard port anything high and random works.
That single change does two things: it encrypts every login session and keeps casual scanners from spotting your firewall on the popular default port 443.
8 — Leave SSH turned off (or harden it, if enabled)

Still on System → Advanced → Admin Access, scroll down to Secure Shell.
If you have a good reason to check Enable Secure Shell, set SSHD Key Only to Require both Password and Public Key, and choose a non-standard port instead of the default port 22. That gives you an encrypted back-door for maintenance while sheltering the daemon from the endless credential-stuffing noise that targets port 22. Ideally, keep SSH disabled!
9 — Tighten Login Protection
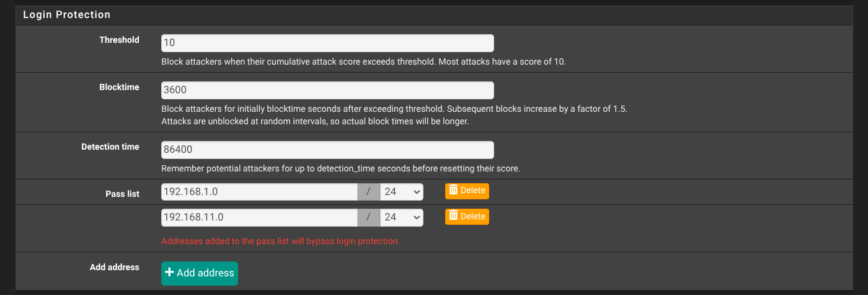
Yet again, on the System → Advanced → Admin Access page, scroll to Login Protection and harden the values. Shown in the screenshot above are my recommended settings: threshold 10, block-time 3600 seconds, detection window 86400 seconds, with at least your internal subnets in the pass-list. These settings lock out an IP for an hour after a bad login attempt, while letting trusted LAN ranges bypass the check.
Of course, like my setup, your pfSense won’t be available via any public ports by default. However, it’s still a best practice to have these settings in place, in the event that pfSense gets unknowingly exposed.
10 — Disable the built-in “admin” user and create your own

Under System → User Manager → Users, click Add to create a new account with a non-obvious username, a strong password, membership in the admins group, and no shell access.

Next, edit the default admin user, tick This user cannot login, and save. From now on, you’ll manage the firewall through that new user only. If you ever need console work, briefly re-enable the original admin account, finish your task, and disable it again. With that, you’re now ready to dive into pfSense configuration!
11 — Check for pfSense updates

System > Update
After installation, it’s good practice to check for any firmware updates or minor point releases. Bug fixes and security updates can drop soon after major versions go live.
12 — Install extra packages for security, automation, and monitoring

Once your base setup is dialed in, head to pfSense > System > Package Manager > Available Packages and install a few core packages that expand what pfSense can do:
- Cron – Adds a GUI to schedule system tasks like rule reloading or custom scripts. Useful for maintenance, cleanup, and automation.
- pfBlockerNG – Brings IP and DNS-level filtering using blocklists, GeoIP, and reputation feeds. Essential for reducing background noise and known-bad traffic before it hits your firewall rules.
- Status_Traffic_Totals – Gives you per-interface traffic usage stats over time. Handy for bandwidth planning and spotting spikes.
- Suricata or Snort – IDS/IPS engines that inspect traffic for known threats. Suricata is multi-threaded and generally preferred on modern hardware.
- System_Patches – Lets you safely apply official or custom FreeBSD patches without command-line work. Helpful for early fixes or Netgate-provided hotfixes.
You don’t have to install them all immediately, but these are the most widely used and trusted additions across homelabs and production deployments. They’re lightweight, integrate cleanly, and give you finer control and visibility over your firewall’s behavior.
Conclusion
Once you’ve locked in these setup changes, you’re ready to dive deeper into your firewall configuration. Check out my pfSense Firewall 2.8: Install, Setup & Config Walkthrough I update it regularly with screenshots and real-world notes from my deployments.
