How to Install Docker on Linux and Run Your First Container
Docker is a platform for packaging and running applications in isolated units called containers. Each container bundles an application together with its libraries and dependencies, sharing the host’s Linux kernel instead of a full separate OS.
In practice, containers are much lighter than traditional virtual machines, yet they allow you to deploy services (websites, databases, media servers, etc.) on any Linux host. For example, a Linux server can run a personal website, a media server, and cloud storage in Docker containers.

This guide (using Ubuntu 24.04 LTS) walks through installing Docker on a Linux server or VM and starting your first container. These steps also work on similar distros like Debian 12/13, Ubuntu 22.04, etc.
Install Docker on Ubuntu 24.04 LTS
First, update your package index and install required tools (for HTTPS repositories):
sudo apt update
sudo apt install -y ca-certificates curl gnupg
Next, add Docker’s official APT repository. This lets you install the latest Docker Engine. Run:
# Add Docker’s official GPG key
curl -fsSL https://download.docker.com/linux/ubuntu/gpg | sudo gpg --dearmor -o /usr/share/keyrings/docker-archive-keyring.gpg

# Set up the Docker apt repository
echo \
  "deb [arch=$(dpkg --print-architecture) signed-by=/usr/share/keyrings/docker-archive-keyring.gpg] \
  https://download.docker.com/linux/ubuntu $(lsb_release -cs) stable" \
  | sudo tee /etc/apt/sources.list.d/docker.list > /dev/null
Note: These steps follow Docker’s official instructions. Find instructions for your distro here.
Now install Docker Engine and related tools:
sudo apt update && sudo apt install docker-ce docker-ce-cli containerd.io docker-compose-plugin
This installs Docker Engine: the command-line interface, the container runtime, and the Docker Compose plugin. The Docker service should start automatically. You can check its status with sudo systemctl status docker. If it isn’t running, start it with sudo systemctl start docker.
Optional: To run Docker without typing sudo, add your user to the docker group:
sudo usermod -aG docker $USER
Then log out and back in (or reboot) so the group change takes effect.
Run Your First Docker Container

With Docker installed, let’s run a test container. Docker uses images (templates) to create containers. Docker Hub (the online image registry) has many official images. A good first test is the hello-world image. In your terminal, run:
docker run hello-world
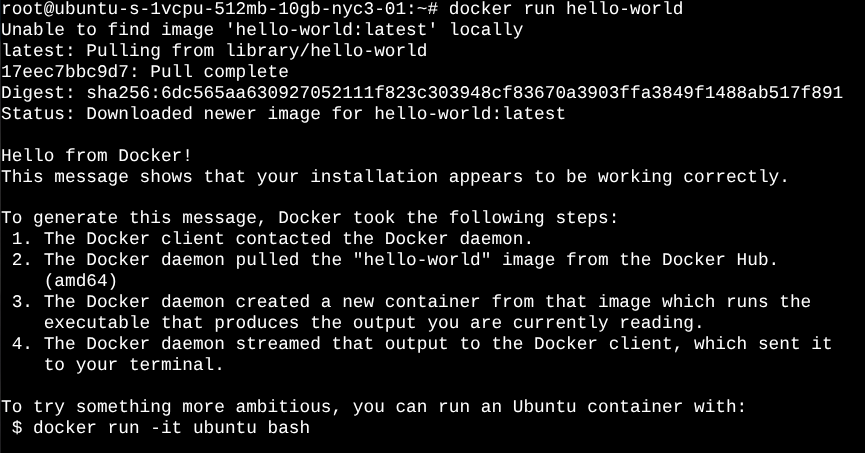
(The sudo is not needed if your user is in the docker group.) Docker will download the hello-world image and run it. You should see a message like “Hello from Docker!” confirming the install.
As the Docker docs explain, hello-world is a test image that prints a confirmation and then exits. For example, after running the command, you’ll see output similar to:
Hello from Docker!
This message shows that your installation appears to be working correctly.
...
This means Docker successfully ran the container and printed its message.
You can now inspect containers and images:
docker psshows running containers (there will be none afterhello-worldexited).docker ps -ashows all containers (including stopped ones). You should see thehello-worldcontainer in the list.docker imageslists downloaded images (you’ll seehello-worldthere).
As another quick test, try running an interactive Ubuntu shell container:
docker run -it ubuntu:24.04 bash
This command downloads the Ubuntu 24.04 image (if not already present) and runs bash inside a new container. You’ll get a shell prompt (as root). Inside the container you can run Linux commands (e.g. apt update, ls, etc.) independently of your host. Type exit to leave the container shell; that stops the container.

You can also run services in detached mode. For example, start an Nginx web server container bound to port 80:
docker run -d -p 80:80 --name myweb nginx
This downloads the nginx image and runs it in the background (-d), mapping container port 80 to host port 80. In your web browser, enter the IP address of your server to test (or with curl localhostor curl remote_ip), you should see the Nginx welcome page. (Stop it with docker stop myweb.)
Congratulations, you now have a working Docker host and have run your first containers!
Next Steps
With Docker set up, you can now explore many Linux server projects in containers. The Linuxblog.io articles “What’s Next After Installation” and “DIY Projects for Linux Beginners” provide great inspiration. For example, you could use Docker to:
- Host a personal website (e.g. Nginx or Apache) in a container.
- Run a media server like Plex or Jellyfin to stream your videos/music.
- Deploy a cloud storage app (Nextcloud/ownCloud) for self-hosted file syncing.
- Set up a VPN or ad-blocking service (OpenVPN, Pi-hole) on your home network.
- Run a database (MySQL/PostgreSQL) container and connect it to your apps.
- Self-host development tools (GitLab/Gitea for Git, Jenkins for CI) in Docker.
- Create a home automation server (Home Assistant) in a container.
- Experiment with containerized firewalls or monitoring tools.
- Oh, also observability. See: Observability – 20 Free Access and Open-Source Solutions.
Each of these projects builds on the Linux home server skills discussed in those articles.
Conclusion
Setting up Docker allows a complete shift in how you can manage, deploy, and scale applications across Linux systems. Whether you’re tinkering with a VM, wrestling with a home server, or building out a full lab environment, containers offer this beautifully clean and consistent way to run services without all the overhead headaches. This used to keep me up at night.
Now that your Docker host is up, you’re ready to start exploring. As you move forward, Docker becomes this incredibly flexible foundation. Keep building, keep breaking things (safely, of course), and keep learning. That’s where the real magic happens. I am, I know I will be!
Nice Article, it doesn’t explain why Docker is better than running those service in a “Linux Jail” or in a VM though. I might try installing it just to play with somethings I’ve been wanting to try, IDK.
Anyways, very well written article.
I haven’t used Docker as yet, but I am in the market for using a couple of containers. I was also doing a comparison between Docker and Podman.
Any thoughts on the differences?
@hydn Great article as always! I enjoy reading what you put together as it is always organized well.
@tmick I do not have much experience with “Linux Jails”, so I wont be able to speak to that, but I use Docker Containers and Docker Compose daily. 90% of the services I run at home are through containers. I have a few VMs still up and running as well.
I personally chose to explore containers more due to an incident I ran into many years ago with my hosted email setup. I use a combination of postfix, dovecot, and opendkim. At the time, I was running them “on bare metal” next to an Icinga2 instance, a Grafana instance, and several other apps.
I was installing updates with apt (sudo apt update && sudo apt upgrade -y), and at the end of the install, postfix was toast. My /etc/postfix directory was mostly empty, and I couldn’t get my email server back up and running (thankfully the actual emails were fine).
I was relatively new to Linux at this time too, so I’m sure plenty of mistakes were made by me that got me into this situation. Maybe I had conflicts in dependencies? Maybe I answered questions from apt wrong? Maybe postfix did an update and I misinterpreted what was happening? Regardless, I decided right then and there, that I didn’t want that situation to happen again.
So why do I use Docker and containers over jails/VMs? Because I wanted to create an environment where one package’s dependencies wouldn’t impact another’s. And I wanted to create a way to quickly “get back” to where I was before a change.
Containers are great for both of those use cases. They are meant to be ephemeral. You can stand them up and blow them away and they should still function the next time you spin it back up. Your config and data lives outside of the container, so you have little risk. I can also easily “transfer” my hosted services to another machine because I can just rsync the configs + data volume to another machine, and spin up a container, and know it will function exactly the same.
Can you do this in a VM? Absolutely! To me, a VM feels too heavy for my use case though. Why spin up an entire operating system and services that requires dedicated high resource allocation by the host when I can get the same with less effort and less resource allocation in a container? Containers are definitely not the end-all-be-all answer, and I’ve definitely seem them used as a hammer when the right tool should’ve been a screwdriver.
I’m guessing you have the experience and knowledge to do something similar with a jail? And I would imagine, based on my limited understanding of jails or chroot, that you could make that function in a very similar way. But for me, containers were the best choice for my use cases. Hopefully my perspective can help answer some of the “why” part of your question!
Your question mostly answered my “why” question. But brings up another one. When you state
Your saying there’s a back-up methodology for them then?
Great question ShyBry747!! I haven’t used either one so I’m no help there.