Nginx tuning tips: HTTPS/TLS – Turbocharge TTFB/Latency
Are you looking to optimize the performance of Nginx? One way to do so is by tuning Nginx to support the latest TLS (Transport Layer Security) protocols (TLS 1.2 & TLS 1.3). In this article, we’ll explore how optimizing Nginx’s TLS config can reduce TTFB (Time To First Byte) latency and turbocharge website speed, providing a better user experience.
Are SSL certificates using SSL or TLS?
Online, we still use the term “SSL” (Secure Sockets Layer) to refer to the encryption protocol used for secure communication, even though they are actually using TLS. For example, SSL certificates are used to establish a secure connection between a client and a server over the internet. However, SSL itself is considered deprecated and insecure, and modern encryption protocols such as TLS are used instead.
Also, the term “SSL certificate” still lives on and is used informally to refer to digital certificates, even though the actual protocol being used is TLS. That said, it’s important to note that TLS should be used instead of SSL, as it is more secure and provides better protection against attacks.
To promote the use of secure encryption protocols, it’s recommended to start using terms like “TLS” and “TLS certificate” in our emails and communications. In fact, as I update this article, I’ll be removing much of the instances of the term SSL.
The importance of TLS 1.2 & TLS 1.3
In the era of digitalization, online security is a major concern for both individuals and businesses. Encryption plays a vital role in safeguarding online data, and one of the most popular encryption protocols is the Transport Layer Security (TLS) protocol. Let’s briefly look at the importance of TLS 1.2 and TLS 1.3.
Since 30th June 2018, the PCI Security Standards Council has required that support for SSL 3.0 and TLS 1.0 be disabled and, more recently, to also disable TLS 1.1. So that, as of updating this article, using TLS 1.2 and 1.3 is strongly recommended. In addition, in 2018 and more aggressively in the past year or two, Google Chrome/Chromium began to mark ‘HTTP’ websites as “not secure.” Over the past few years, the internet has swiftly transitioned to HTTPS. Over 90% 95% of Chrome’s traffic loads over HTTPS, and 100% of the web’s top 100 websites now use HTTPS by default!
With this in mind, let’s look at Nginx TLS tuning tips to improve the performance of Nginx + HTTPS for better TTFB and reduced latency.
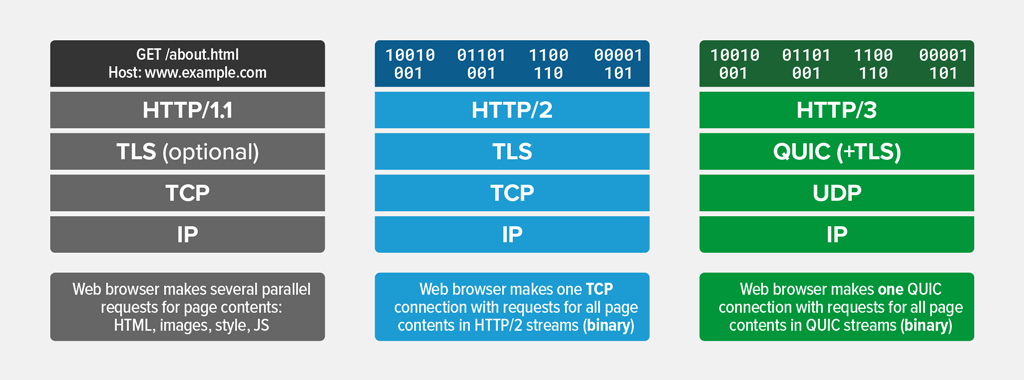
Enable HTTP/2 and HTTP/3 & QUIC on Nginx

The first step in tuning Nginx for faster TTFB/latency with HTTPS is to ensure that at least HTTP/2 is enabled. HTTP/2 was first implemented in Nginx version 1.9.5 to replace spdy. Enabling the HTTP/2 module on Nginx is simple. We need to add the word http2 in the server block of our Nginx config file (ex. /etc/nginx/sites-enabled/sitename). (Remember: HTTP/2 requires HTTPS)
Look for this line:
listen 443 ssl;
change it to:
listen 443 ssl http2;
That’s it!
Enable HTTP/3 with QUIC
HTTP/2 is used by 40% of all the websites, and HTTP/3 is used by only 20% 25% (Source)
Until recently, mainstream distributions of Nginx did not come with HTTP/3 support built-in. HTTP/3 support in Nginx typically required patching and compiling Nginx from source with the necessary HTTP/3 and QUIC modules, such as quiche, which is developed by Cloudflare. On such versions, here’s a method to enable HTTP/3 with QUIC by following this guide.
As of November 28th’s update of this article, Nginx has included experimental support for the QUIC and HTTP/3 protocols starting from version 1.25.0. This means that, unlike previous versions where patching and manual compilation were required, Nginx now offers HTTP/3 support as a part of its core, albeit in an experimental phase.
However, it’s important to note a few key aspects of this support:
- Experimental Nature: The support for HTTP/3 in Nginx version 1.25.0 is labeled as experimental. This implies that while the functionality is available, it might not be fully stable and could have some issues or limitations. It’s advisable to use this in a testing or development environment before deploying it in a production setting.
- Manual Module Activation: The
ngx_http_v3_module, which provides HTTP/3 support, is not built by default in Nginx 1.25.0. To use this module, it needs to be explicitly enabled during the Nginx configuration and build process. This is done using the--with-http_v3_moduleconfiguration parameter. - SSL Library Requirements: For building and running the
ngx_http_v3_module, an SSL library that supports QUIC, such as BoringSSL, LibreSSL, or QuicTLS, is recommended. Using the OpenSSL library is possible, but it will involve an OpenSSL compatibility layer that does not support certain features like early data.
Given these factors, while Nginx now includes native HTTP/3 support in its more recent versions, it’s still in an experimental stage and requires specific configuration steps to enable and use it effectively.
That said, here’s a brief guide to enable HTTP/3 with QUIC on Nginx version 1.25.0 or later, which includes experimental support for these protocols:
1. Install Dependencies
Ensure that you have the necessary dependencies, including a compatible SSL library. For example, install libreSSL on Ubuntu/Debian using the following command:
sudo apt-get install libssl-dev
2. Install Nginx 1.25+
Follow these instructions.
3. Enable ngx_http_v3_module
Even though Nginx 1.25 includes the capability for HTTP/3 support, the ngx_http_v3_module responsible for this functionality is not enabled by default. To activate this module, you need to specifically include it during the configuration phase before compiling Nginx.
./configure --with-http_v3_module
Note: Add any other configuration flags you normally use.
4. Complie and install Nginx
make
sudo make install
5. Configure Nginx for HTTP/3
Edit your Nginx configuration file (usually located at /usr/local/nginx/conf/nginx.conf or /etc/nginx/nginx.conf). Add the following in your server block:
server {
listen 443 ssl http2;
listen [::]:443 ssl http2;
listen 443 quic reuseport;

ssl_certificate /path/to/your/certificate.pem;
ssl_certificate_key /path/to/your/key.pem;

# Enable HTTP/3
ssl_protocols TLSv1.3;
ssl_prefer_server_ciphers off;

# Add other server configurations...
}
6. Restart Nginx
sudo nginx -s reload
That’s it, test, test, test! The ngx_http_v3_module is still experimental, so it’s advised to use this setup in a controlled environment before deploying it to production.
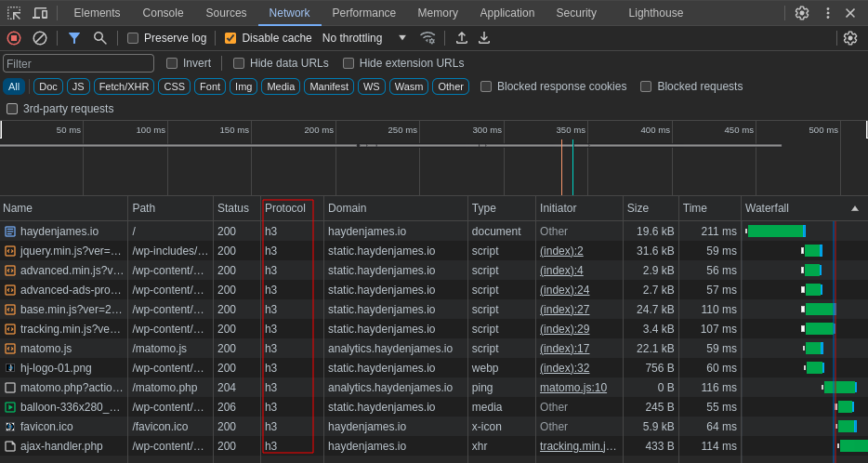
Check if HTTP/2 or HTTP/3 is enabled using Google Chrome
To confirm if HTTP/2 or HTTP/3 is enabled:
> open your website in Google Chrome
> right-click anywhere on the web page and select Inspect
> click the Network tab
> press F5 (on your keyboard) or refresh your web page manually
> the Protocol column should now show h2 or h3 for all assets loaded via your server
> If the Protocol column is missing, you can add it using right-click.

Google Chrome inspect network http/2 (h2), http/3 (h3) check.
Check if HTTP/2 or HTTP/3 is enabled using the command line
To test from your Linux/Mac command line with curl:
(Don’t also forget to curl test your CDN-hosted requests. Example: cdn.domain.com.
Compare KeyCDN, BunnyCDN and other CDN providers which support HTTP/2)
curl --http2 -I https://domain.com/
curl --http3 -I https://domain.com/
If the –http3 command does not work, you can also check here.
Enable SSL session cache
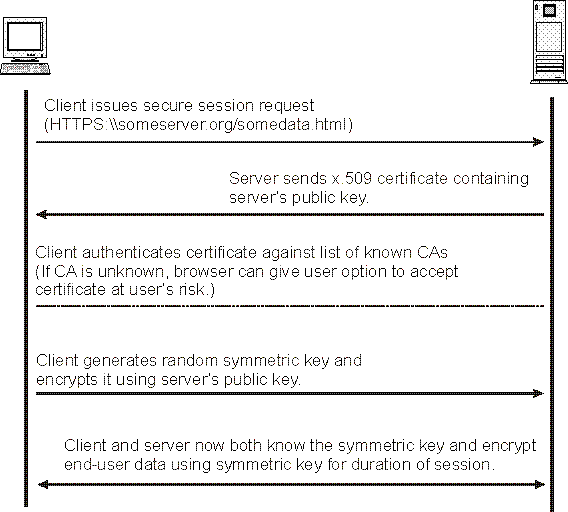
With HTTPS connections, instead of end-users connecting via one round trip (request sent, then the server responds), the connection needs an extra handshake. However, using HTTP/2 and enabling Nginx ssl_session_cache will ensure faster HTTPS performance for initial connections and faster-than-http page loads.
Using the option ssl_session_cache shared:SSL:[size], you can configure Nginx to share cache between all worker processes. One megabyte can store about 4000 sessions. You’ll also want to specify the time during (cache TTL) allowed for reuse:
ssl_session_cache shared:SSL:1m; # holds approx 4000 sessions
ssl_session_timeout 1h; # 1 hour during which sessions can be re-used.
Disable SSL session tickets

Because the proper rotation of session ticket encryption key is not yet implemented in Nginx, you should turn this off for now.
ssl_session_tickets off;
Update: Update Nginx 1.23.2 and newer to support ssl_session_tickets. So keep this on:
ssl_session_tickets on;
Disable old TLS versions 1.0, 1.1 and even 1.2.
As we’ve discussed in the opening, HTTPS and HTTP/2(3) are a move toward the latest, fast and most secure web technology. In light of this, TLS 1.0 should be disabled. Update May 2022: its now recommended to disable TLSv1.1 and 1.2 and only enabling TLSv1.3 (Nginx 1.13+ required for TLSv1.3).
Legacy versions of Nginx, look for: please upgrade.
ssl_protocols TLSv1 TLSv1.1 TLSv1.2;modify the line to:
ssl_protocols TLSv1.2;
Nginx 1.13+
For Nginx 1.13+ enable TLSv1.3, look for:
ssl_protocols TLSv1 TLSv1.1 TLSv1.2;
modify the line to:
ssl_protocols TLSv1.3;
Enable OCSP Stapling
OCSP (Online Certificate Status Protocol) stapling is an alternative approach to the OCSP for checking the revocation status of X.509 certificates. Enabling OCSP stapling allows the Nginx to bear the resource cost involved in providing OCSP responses by appending (“stapling”) a time-stamped OCSP response signed by the CA to the initial TLS handshake, eliminating the need for clients to contact the CA.
Also see: Using OCSP Stapling to Improve Response Time and Privacy.
ssl_stapling on;
ssl_stapling_verify on;
ssl_trusted_certificate /path/to/full_chain.pem;
resolver 8.8.8.8 8.8.4.4 valid=300s;
resolver_timeout 5s;
Note: ssl_trusted_certificate specifies the trusted CA certificates chain file, in PEM format, used to verify client certificates and OCSP responses.
Reduce SSL buffer size
The Nginx ssl_buffer_size config option sets the size of the buffer used for sending data via HTTPS. By default, the buffer is set to 16k, a one-size-fits-all approach geared toward big responses. However, to minimize TTFB (Time To First Byte), it is often better to use a smaller value, for example:
(I was able to shave about 30 – 50ms off TTFB. Your mileage may vary.)
ssl_buffer_size 4k;
Full Nginx SSL config for improved TTFB
Pasted below my full Nginx SSL_* config for your convenience:
ssl_protocols TLSv1.3;
ssl_prefer_server_ciphers on;
ssl_ciphers 'EECDH+AESGCM:EDH+AESGCM:AES256+EECDH:AES256+EDH';
ssl_ecdh_curve secp384r1; # see here and here (pg. 485)
ssl_session_cache shared:SSL:5m;
ssl_session_timeout 24h;
ssl_session_tickets on;
ssl_stapling on;
ssl_stapling_verify on;
ssl_trusted_certificate /path/to/your/CA/chain.pem;
resolver 8.8.8.8 8.8.4.4 valid=300s;
resolver_timeout 5s;
ssl_buffer_size 8k;
Test config, then reload Nginx after changes:
nginx -t
nginx -s reload
Enable HTTP Strict Transport Security (HSTS)
Another Nginx HTTPS tip is to enable HSTS preload. HTTP Strict Transport Security (HSTS) is a header that allows a web server to declare a policy that browsers will only connect to using secure HTTPS connections and ensures end users do not “click-through” critical security warnings. (locks clients to HTTPS) This policy enforcement protects secure websites from downgrade attacks, SSL stripping, and cookie hijacking. Also, see https://hstspreload.org/#submission-requirements.
add_header Strict-Transport-Security "max-age=63072000; includeSubdomains; preload";
Other headers I use in my Nginx config for this blog are:
add_header X-Frame-Options sameorigin; # read here
add_header X-Content-Type-Options nosniff; # read here
add_header X-Xss-Protection "1; mode=block"; #read here
Also, see Analyze Your Website’s TTFB (Time to First Byte).
HTTP/2 reference and useful reading
- https://developer.mozilla.org/en-US/docs/Web/HTTP/Headers – HTTP headers
- https://weakdh.org/sysadmin.html – Guide to Deploying Diffie-Hellman for TLS
- https://ssl-config.mozilla.org/ – Mozilla SSL Configuration Generator
- https://www.ssllabs.com/ssltest/ – SSL Server Test
- https://www.nginx.com/blog/http2-module-nginx/ – The HTTP/2 Module
- https://istlsfastyet.com – Is TLS Fast Yet?
- http://www.httpvshttps.com – HTTP vs HTTPS Test
- https://linuxblog.io/free-linux-server-monitoring-apm-sysadmins/ – Free web server monitoring
HTTP/3 & QUIC reference and useful reading
- https://www.nginx.com/resources/glossary/quic-http3/ – What are QUIC & HTTP/3
- https://http3-explained.haxx.se/ – HTTP/3 explained
- https://www.akamai.com/blog/developers/a-quick-introduction-http3 – A QUICk Introduction to HTTP/3
- https://www.chromium.org/quic – Chromium: QUIC, a multiplexed stream transport over UDP.
- https://github.com/quicwg/base-drafts/wiki/Implementations – List of QUIC implementations.
- https://blog.cloudflare.com/tag/http3/ – Cloudflare on HTTP/3.
- https://datatracker.ietf.org/doc/html/draft-ietf-quic-http-34 – Hypertext Transfer Protocol Version 3, draft-ietf-quic-http-34.
Published: June 30th, 2018 | Last updated: November 29th, 2023
I never actually tried anything like this. I am curious to see if I can notice any differences. I will give this a try later today. Thanks for the information and for going into detail.
I am wondering though, I use Brave as my main browser. Would it be the same approach as Chrome?