How to Upgrade ThinkPad Firmware on Linux (fwupd)
Two days ago I ran the command hostnamectl status and noticed that my laptop’s firmware date was Tue 2023-08-08. I purchased this ThinkPad T14s laptop 2 years ago. So it seems, since removing Windows 11, the firmware remained on the same version. No cool!
However, updating your ThinkPad’s firmware (BIOS/UEFI and other controller firmware) on Linux is much easier than it used to be. No need to boot into Windows or create a DOS USB stick. You can do it right from your Linux system using the fwupd tool and the Linux Vendor Firmware Service (LVFS).
In this article, we’ll walk through updating my Lenovo ThinkPad T14s Gen 3 AMD firmware on any Debian-based distro (like Ubuntu, Kali, Mint, etc.) in a friendly, step-by-step way. (Kali is basically Debian Testing, so the steps are basically the same on Debian Trixie.) The process is similar for other T-series models and most newer Lenovo ThinkPads, so even if you have a different ThinkPad or even a Dell or other brand laptop, read on!
Why update your firmware?
")
New firmware versions can fix bugs, improve stability, and even patch security issues. For example, my T14s Gen3 was running BIOS v1.35 from August 2023, and Lenovo had released a newer version (v1.46) with important fixes and enhancements. Thanks to Lenovo’s support for LVFS, these updates are available directly through fwupd, so let’s get to it.
1. Install fwupd and Prepare Your System
First, ensure you have the necessary tools installed. On Debian/Ubuntu, that means installing fwupd and a few related packages for UEFI capsule updates. Open a terminal and run:
sudo apt update && sudo apt install fwupd fwupd-efi fwupd-signed shim-signed mokutil
This command will update your package lists and install:
- fwupd (the firmware update daemon/CLI),
- fwupd-efi (the UEFI update capsule helper, if available on your distro),
- fwupd-signed (signed fwupd EFI binaries for Secure Boot),
- shim-signed (the UEFI shim loader, needed if Secure Boot is enabled),
- mokutil (tool to manage machine owner keys, useful for Secure Boot scenarios).
Note: If fwupd-efi isn’t found in your repositories (for example, was not found on my install of Kali), don’t worry, it might not be required on your system. The other packages will cover the functionality. Also, some distros like Ubuntu might already have fwupd pre-installed.
Before proceeding, make sure your system is actually booted in UEFI mode (firmware updates won’t work in Legacy/BIOS mode). You can check this by verifying the presence of the /sys/firmware/efi directory:
test -d /sys/firmware/efi && echo "UEFI boot OK" || echo "Not UEFI"
If that returns “UEFI boot OK,” you’re good to go. If it says “Not UEFI,” you’ll need to boot in UEFI mode. Also, ensure the EFI system partition is mounted at /boot/efi (most distributions do this automatically). You can check that with:
findmnt /boot/efi
The above command will show if /boot/efi is already mounted. For example, on my system it showed the EFI partition mounted on /dev/nvme0n1p1 with the correct FAT filesystem.
2. Refresh LVFS Metadata and Check for Updates
With the initial setup done, let’s use fwupd to see what firmware updates are available for your ThinkPad. First, refresh the firmware metadata from LVFS (Linux Vendor Firmware Service) to make sure we have the latest list of updates:
fwupdmgr refresh --force
This will download the latest firmware catalog. For example, you might see output like:
hydn@ThinkPad:~$ fwupdmgr refresh --force
Updating lvfs
Downloading… [***************************************]
Successfully downloaded new metadata: Updates have been published for 4 of 18 local devices
Now, list the available updates for your system’s devices:
fwupdmgr get-updates
This command will output a list of devices and indicate which have updates available. Don’t be alarmed by a long list, it shows all firmware components (many might say “no available updates”). Look for your ThinkPad’s main components, typically “System Firmware” (the BIOS/UEFI) and “Embedded Controller,” as well as any others like Fingerprint Sensor, Thunderbolt, SSD, etc. In my case, the output showed something like this (trimmed for brevity):
Devices with no available firmware updates:
SHPP41-1000GM (my NVMe)
Touchpad firmware
Fingerprint Sensor
Integrated Camera
… (other devices) …

<LENOVO model code>
│
├─Embedded Controller:
│ Current version: 0.1.29
│ Vendor: Lenovo
│ Update available: **0.1.32** (High urgency)
│ → ThinkPad X13/T14s Gen 3 AMD Embedded Controller Update
│
├─System Firmware:
│ Current version: 0.1.35
│ Vendor: Lenovo
│ Update available: **0.1.46** (High urgency)
│ → ThinkPad X13/T14s Gen 3 AMD System Firmware
│
├─KEK CA (Secure Boot Key Exchange Key):
│ Update available: new version 2023
│ → UEFI Secure Boot KEK update
│
└─UEFI dbx (Secure Boot Forbidden Signatures database):
Update available: new version 20250507
→ UEFI dbx update
(The above is a simplified excerpt.)
As you can see, fwupd discovered a BIOS update from version 1.35 to 1.46, and an Embedded Controller firmware update from 0.1.29 to 0.1.32. It also listed updates for the UEFI Secure Boot keys (KEK and dbx). Lenovo publishes these updates through LVFS, so we get them automatically via fwupdmgr. The tool also gives some info about each update (like urgency “High” and a brief description of fixes or features).
3. Applying the Firmware Updates
Time to actually install the updates. This is the easy part, just run:
fwupdmgr update
fwupdmgr will go through each available update one by one, ask for confirmation, and stage them for installation. You’ll see interactive prompts in the terminal for each firmware component. For example, my session showed:
╔══════════════════════════════════════════════════════════════════════════════╗
║ Upgrade Embedded Controller from 0.1.29 to 0.1.32? ║
╠══════════════════════════════════════════════════════════════════════════════╣
║ This stable release fixes the following issues: ║
║ * Change to permit fan rotation after fan error happens. ║
║ … ║
║ 21CQ000DUS must remain plugged into a power source for the duration of the ║
║ update to avoid damage. ║
╚══════════════════════════════════════════════════════════════════════════════╝
Perform operation? [Y|n]: y
When you see the prompt, type “Y” (or just hit Enter since the default is Yes) to confirm each update. Make sure your ThinkPad is plugged into AC power during this process because the firmware updates won’t run if you’re on battery.
After you confirm, fwupd will download and install (stage) the update. For some devices, updates can apply immediately, but system firmware and controller related updates require a reboot to actually flash the new firmware. The output will indicate success or failure for each stage. In my case, all firmware was “Successfully installed” (meaning it’s staged for next boot), and after going through all updates, fwupd said:
An update requires a reboot to complete. Restart now? [y|N]:
At this prompt, you can press “y” to reboot immediately. If you choose “N” (or just don’t type anything and close the terminal), you can reboot on your own later – the updates will apply on the next boot either way. I didn’t try that.
4. Reboot and Firmware Flashing (BIOS Self-Healing)

Do not power off the laptop during this step! Just let it run.
Sorry for the poor-quality photo. I had no plan on writing this article and was already deep in the rabbit hole of upgrading my firmware, with a backup plan to try CachyOS if things went south and I needed to restore my laptop. You’ve been there! lol
When you reboot, your ThinkPad’s firmware will kick in to actually flash the updates that were staged. Instead of booting straight to Linux, the laptop will perform the firmware update in a special environment. Don’t panic! The screen will display messages like “Please wait while we install a system update” and “BIOS Self Healing backup progressing”, or it might just show a Lenovo logo with a progress bar. In my case the screen even went blank for what seemed like 5 minutes… this is all normal for these firmware updates.
Lenovo ThinkPads have a “BIOS self-healing” feature that backs up the current firmware just in case before updates it. You may hear some beeps and see the machine restart a couple of times during this process. Do not power off the laptop during this! Just let it run. The update process took about 5 or 10 minutes. Once the firmware flash is complete, the system will reboot itself, and you’ll boot back into your OS as usual.
(If the screen stays blank during the update, check the power LED or indicator lights – on some models, blinking patterns indicate update progress. Be paitient!
5. Verifying the Update
After the system comes back up, you’ll want to confirm that the updates applied correctly. You can run the hostnamectl status command from the terminal, which often shows the “Firmware Version” for the system. For example, after my update, I expect the BIOS version to reflect the new version (v1.46 instead of v1.35 previously).

You can also use fwupd to list devices and their firmware versions with:
fwupdmgr get-devices
Or to see a log of recently applied updates, run:
fwupdmgr get-history
If you run fwupdmgr get-updates again at this point, it should also report no available updates for the components you just updated (since you’re now on the latest firmware).

6. Wrapping Up
This process via fwupd and LVFS is the same for most Lenovo ThinkPads, so you can use it to keep your firmware current going forward. In fact, it’s a good idea to run fwupdmgr get-updates every once in a while or enable fwupd’s auto-check service, so you don’t miss future firmware releases.
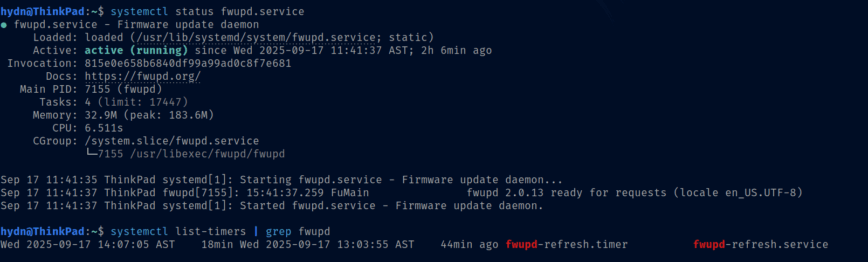
This is simple; first, check the status with:
systemctl status fwupd.service
systemctl list-timers | grep fwupd
If not enabled, enable with:
sudo systemctl enable --now fwupd.service
sudo systemctl enable --now fwupd-refresh.timer
Mine defaulted to hourly. So I changed it to daily by editing /etc/systemd/system/fwupd-refresh.timer.d/override.conf. To do so run:
sudo systemctl edit fwupd-refresh.timer
Then you can add this to the override file:
[Timer]
OnCalendar=daily
RandomizedDelaySec=1h
Please it in the location see here:

Congratulations! You’ve upgraded your ThinkPad’s firmware on Linux! Your BIOS/UEFI (system firmware) and embedded controller (EC) are now updated to the latest versions, and any important Secure Boot databases were updated as well.
Lastly, here is some related reading that Linux ThinkPad and laptop users may find useful:
- ThinkPad T14s Gen 3 AMD Linux user review and tweaks: check it out to learn about optimizing this laptop for Linux (fan control, performance tweaks, etc.).
- For a broader guide on ThinkPad laptops and Linux, see my ThinkPad laptops Linux guide, which covers many models.
- Thinking about your next Linux laptop or want to know which machines work best with Linux? See my roundup of the best Linux-compatible laptops for recommendations (hint: ThinkPad made the top 5 lol).
- Want to boost your battery life on Linux? Consider using TLP; read Boost Battery Life on Your Linux Laptop with TLP.
With your firmware up to date and these tips in hand, you’re all set to enjoy your ThinkPad on Linux to the fullest. Happy updating and happy Linux-ing!
Update: I received this helpful email from Thomas Koch:
> Hi Hayden, I enjoyed your blogpost about firmware updates and want
> to suggest a change: It is unnecessary (and bad practice) to call
> fwupdmgr with sudo. The background daemon (/usr/lib/fwupd/fwupd)
> addressed by fwupdmgr has the necessary rights to execute. If a
> reboot is required, fwupdmgr requests root rights. Regards, Thomas
Additional email trail:
On 9/24/25 12:07, Hayden James wrote:
> Hi Thomas,
> Thanks for taking the time to add this correction.
> I will make this change. I’m traveling today so won’t be immediately.
> However, I would like to add credit, do you have a GitHub, website or
> other that I can link to?
> Constantly learning here. Appreciate the info, will verify and update as
> promised
> Thanks again!
>Hi Hayden, I anticipated your question and, rummaged my memory and the internet
> before writing my message, but unfortunately I couldn’t find anything
> conclusive. Even the README on GitHub [1] misrepresents it:
> Basic usage flow (command line)
> # fwupdmgr get-devices
> # fwupdmgr refresh
> …
> One indication would be that the fwupdmgr manpage is in section 1 for
> user commands and not in section 8 for admin commands that require root.
> Fact is that all your example commands with fwupdmgr also work without
> root/sudo. Try it out.
> https://github.com/fwupd/fwupd/blob/main/README.md
>Kind regards, Thomas Koch

Just a note, this should work the same or similarly on most laptops. If you are successful, please let us know. As per usual, the Arch Wiki was helpful. I’ve linked to it in the article. If you are on Arch / Arch-based, refer to the Arch Wiki:
Edit: Here’s the full update log I grabbed from my PC at the time:
I hadn’t planned on writing about this, so I didn’t take any screenshots. But I always export output like this so I can refer to it later if needed. Imagine all this started because of changing my laptop’s hostname and noticing the old firmware, lol!
Thank you for the in depth article!
This new “fwupd” process makes me long for the days of old when it was as easy as writing the correct floppy disk or CD-R, booting from it, and updating the firmware.
Thanks. I have to make a small correction. Regarding the use of sudo a reader sent me the feedback. I will update the original article and also edit this message once it’s added. I emailed him back yesterday requesting his information so I can add credit. I see this morning he has responded. Will update.
Updated the article with the corrected feedback from Thomas Koch.
This is really useful, Thanks Hydn.